Paint a Room

How Long does it Take to Paint a House – Remodel On Point

Last Updated: 2022-02-16By

The appearance of the house plays a huge role in its perception, both by residents and guests. To give it a proper look, it is important to paint it with high quality. You can hire professional painters to paint your home, or do the job yourself.

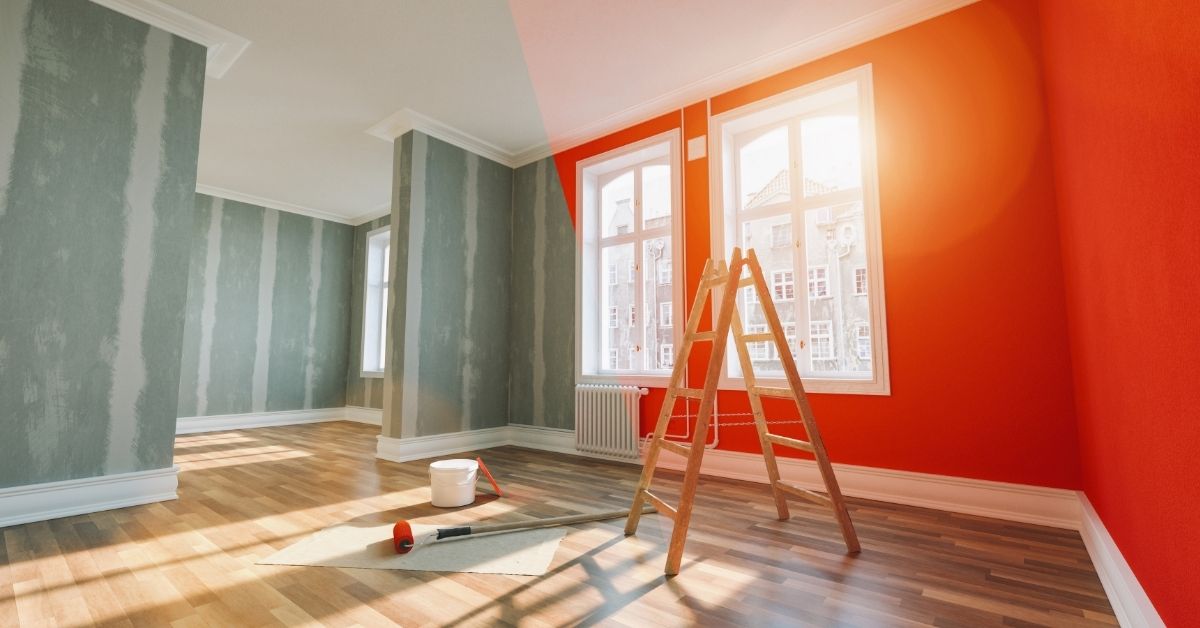
Painting a house with an area of 2000 sq ft will take up to 10 days. This is how long it takes two painters for interior and exterior painting. If you do the work yourself, the process can take 16 days, provided that you devote at least 6 hours a day to painting the house.

1000 sq ft2000 sq ft3000 sq ft
DIY with Friend12 Days16 Days22 Days
2 Professionals7 Days10 Days14 Days
4 Professionals5 Days7 Days9 Days

Painting a house can be divided into two main parts, these are interior and exterior painting. Each of the parts has its difficulties and features that affect the speed of painting. Let’s take a closer look at what stages the external and internal painting of a house consists of.

[instagram-feed]

How Long is Interior Painting of 2000 sq ft House?

The time required for painting 2000 sq. ft. at home directly depends on who will do the work. It will be logical that a DIY project will take much longer than a professional painter would do. On average, a team of two people will need up to 10 days to complete the painting work, in a house with a size of 2000 sq. ft.

Wall painting consists of several stages after which it is necessary to allow time to dry the paint. Here is a basic list of the jobs affecting how long does it take to paint a house interior:

1000 sq ft2000 sq ft3000 sq ft
Preparing and Patching Holes1 – 1.5 days2 days3 days
Application of Primer1 – 1.5 days2 days2 days
First Coat on Walls and Ceiling2 days3 days3 – 4 days
Doors and Trims1 day1 day2 – 2.5 days
Second Coat of Paint1 – 2 days2 days2 -3 days
Total Time6 – 7.5 days10 days12 – 14.5 days
Time are indicated for the work of two professional painters.

Each of the stages of painting has its characteristics that affect the speed of work. For a better understanding, it is worthwhile to figure out what is being done at each stage, and what situations can increase the time spent on painting the interior.

  1. Preparing and Patching Holes
  2. Application of Prime
  3. First Coat on Walls and Ceiling
  4. Doors and Trims
  5. Second Coat of Paint

In most cases, the time required for each of these processes is individual. This is due to the complexity of the interior or damage to the walls.

Preparing and Patching Holes

The first stage before painting the walls is preparatory work. During this process, the room is made as empty as possible, removing all furniture and things from it. Having freed up the space of the room, it is necessary to prepare all surfaces for painting. To do this, clean out old paint and patch holes that could have formed on the walls.

During preparation, cover all surfaces that will not be painted with a canvas cloth. Also, for the corners of surfaces, masking tape can be used, which can be easily removed after painting. This is done in order not to smear paint on the floor and other details.

Application of Primer

The next step in painting walls is priming. The primer is applied to the walls to better adhere to the paint. The paint adheres much better to the primer than to bare walls.

This significantly reduces the number of paint coats required for the walls. Using a primer saves the amount of material and time required for painting.

First Coat on Walls and Ceiling

When the primer is dry, you can proceed directly to paint. During this process, the first coat of paint is applied to the walls and the ceiling is painted. The application of the first coat of paint to the walls is divided into two processes, “cut in” and painting the main surface.

Cut in is painting the border of all surfaces with a brush. After that, it is much easier to paint the wall with a roller, without leaving the aisles of the painting zone.

Doors and Trims

While the first coat of paint on the walls and ceiling dries up, paint the doors and trims. This stage requires painting skills, as it is done with a brush or spray.

In most cases, doors and trims have uneven surfaces, making the painting process difficult. Because of this, the relatively small surface of doors and trims takes a long time to paint.

Second Coat of Paint

The final touch in painting a room is considered to be the second coat of paint. Reapplying paint to the wall creates contrast and a deeper shade of the selected color. After the final layer of paint has dried, they are cleaned and the furniture is brought into the room.

How does House Layout Affect Painting Speed?

Explanation of how things are different, houses can be open and easy to paint, many rooms make it more complicated.

How long does it take to paint a house can also be influenced by the layout of the house. To understand this, let’s take two houses in the same area. In the first version, we will have a house with spacious rooms and few walls, and in the second house, there will be many small rooms fenced with walls and doors.

In the first version, it is much easier to work at home. Open spaces are much easier to paint because you have fewer corners and walls. In such rooms, 4 people can easily work without interfering with each other, which will significantly speed up the process.

If there are many small rooms in the house, the painting of the house will be delayed. Firstly, because of the large number of walls, there will be a lot more work. Secondly, in small rooms, it is much more difficult to work because of the limited space.

As you can see, the layout of the house also greatly affects the speed of painting. The difference in time required to paint a house with the same area can be up to 3 days, which will significantly increase the repair time.

How Long Does Exterior Painting Take?

In addition to painting the interior, there is also the exterior painting of the house. The time required for an exterior house painting can vary significantly on each project.

First of all, it depends on what material the exterior of your house is made of. There are several options on which the time required for painting the exterior depends.

MaterialDays
Brick and Stone0
Combined Materials1 – 3
Wood and Plaster4
The time needed two painters for painting 2000 sq ft house exterior.

Brick and Stone

If your house is made of brick or stone, then in most cases you will not need to paint them. Metal facade panels, which have become very popular in modern houses, also belong to materials that do not require painting.

The only time an exterior painting may be needed for such a house is when a complete renovation is being carried out and the bricks have become very tarnished. Since this is a very individual case, it is better to check with the company that will carry out the work about the time required for painting the bricks.

Combined Materials

Commonly, the house exterior is made of combined materials to make the house look beautiful. For example, the walls of a house can be made of plaster and the corners are lined with bricks or stone tiles.

In the case of using combined materials, the time required for painting a house exterior depends on the size of the surfaces to be painted. In most cases for a 2,000 sq ft home, exterior painting will take 1 to 3 days.

Wood and Plaster

Wood and putty are the most commonly painted materials. Therefore, if the exterior of your house is made of these materials, then the time required to paint it will be maximum. It will take 4 days to paint an entire 2000 sq ft house with a couple of professionals.

House Exterior Surfaces that Need to be Painted

In addition to the walls themselves, the house exterior has some surfaces that can also be painted. Such surfaces include window frames, downpipes, and doors. The time of their painting directly depends on their quantity. On average, it will take up to two days to paint all of these elements for a medium-sized home.

How Long does it Take to Paint a House by Yourself

It is very difficult to answer the question of how long does it take to paint a house on your own since there are a lot of variables here. If you want to know how much time it will take you to paint your house, then you should take into account the time that professionals spend on it.

Professional painters will paint the house with high quality and quickly, nevertheless, their services are quite expensive, for example, the cost of painting a house with dimensions of 2000 sq. ft. will cost about $ 4000.

If you are not in a hurry and are ready to work on your own, then this will save the cost of painting, but you will do it longer than professionals.

First of all, you should understand that when you paint at home yourself, painting time is not the main criterion. If you have never done this, then you should not rush and invest in the temporary norms of professional painters.

Plan your schedule correctly and paint your house in stages. Also, to work comfortably, find yourself an assistant. Many work processes during home painting are very difficult to do alone so better find someone who helps you.

editor's pick

latest video

news via inbox

Nulla turp dis cursus. Integer liberos  euismod pretium faucibua

Each building has some sort of driveway or at least should have. The main reason is for vehicles to come closer without need to walk all the way. Some homes are residential with small driveway for their car to come in and park before garage or front entrance, and others can be large commercial buildings with loading docks, delivery entrances and casual parking entrances. On Point Remodeling was asked for suggestions on residential driveway for new home construction, and we decided to write detailed article for all our readers. Using this guide you can select the material for your driveway and see what works for your budget. Here are the materials for driveway we will be discussing in our guide:
  • Asphalt
  • Concrete
  • Paver Stone
  • Crushed stone
  • Brick
  • Seashell
  • Gravel
To find good contractor for your driveway, you can either ask our team by email or try to find someone local that worked with neighbors or nearby buildings.

Installation process of any material surface on your driveway

a) Demolition and Excavation – Before anything is done, your contractor will get heavy machinery and scratch off old layer of driveway. They need to go down at least 5-6 inches to insure proper layering before your final layer of material is installed. b) Material Purchase and Delivery – At this point your contract is signed and you already know how the surface will look. Contracting company purchases necessary materials and delivers them to site. Double check if material is correct and not damaged. c) Preparation of Sublevel – Whatever you place as final material, it cannot just be installed directly on top soil. Gravel is the first choice of material that goes down at this stage. Other preferred material is screen sand that can go on top of gravel and works better with stone and bricks. d) Compaction of Ground – To prevent your driveway from moving and changing shapes, all the layers from bottom up have to be properly compacted. Do not leave any spot untouched while doing this or you can get small holes and cracks in driveway after installation. E) Final Installation – This is when all the magic happens. After all preparations and dirty work the final installation is made literally within hours and you can enjoy new driveway. Stone and brick is set up by hand, while other materials require some sort of machinery with manual labor to even out surface.

1. Asphalt

Probably the most used material for road top surfaces as well as driveways is asphalt. This is a mix of gravel and sand that is mixed in and combined by asphalt cement with crude oil. Pros of Asphalt Driveway
  • Very popular and easy to find materials/contractor
  • Completed in 1 day and you can drive on it after
  • Patches and small holes can be fixed fast
Cons of Asphalt Driveway
  • Easy to damage and cracks appear in few years
  • Almost everyone else has same surface
  • Oily surface and chemicals used in mix
Prepared for asphalt driveway will cost you around $5 per square foot to finish. The contractors that take care of entire process from taking out old driveway surface, install subsurface and compact the ground with new asphalt on top, will charge on average $5500 per regular size driveway at single home property.

2. Concrete

What we call concrete is a mixture of Portland cement, aggregate as well as sand with gravel. Suggested thickness of concrete for driveway is 6 inches. The mixture needs to cure without being touched or driven on top for several days. Pros of Concrete Driveway
  • Durable material for large weights
  • Long lifespan if installed properly
  • Winter and summer friendly
Cons of Concrete Driveway
  • Has marks and stains over time
  • Hard to repair without replacement
  • Super hard to DIY
To hire contractors for concrete driveway it will cost around $7-$9 per square foot. This will include site preparation with gravel spread and new concrete installation. They will order full truck of concrete (or several for larger driveways) to pour inside forming. Smoothening and curing is required after installation.

3. Paver Stone

The most luxurious material that you can use to create driveway path with is paver stone. It is made out of natural stone with uneven rough shapes that have different line patterns. Paver stones are very heavy and are perfect for weights on top of them. Almost every city in Europe has roads and walks made out of stone that were installed centuries ago. Pros of Paver Stone Driveway
  • Creative designs can be done
  • Personal looks, can match the house
  • Can replace single stone in minutes
Cons of Paver Stone Driveway
  • Weeds growing through
  • Stone can move over time
  • Most expensive material
There is wide selection of stone that can be purchased for your driveway. On average we recommend settling with $17-$20 per square foot for stone with installation included. Working with this material is very intense labor and we recommend hiring professionals that do this type of work every day.

4. Crushed Stone

Our readers sometimes mistake crushed stone with gravel, but this is not the same material. Crushed stone material is achieved when machine is mechanically crushing larger pieces of unused stone for this specific purpose. It is larger than gravel and can have smooth finish. Crushed stone can also have a mix of colors, which is much pleasant to eyes than gravel. Pros of Crushed Stone Driveway
  • Low maintenance required
  • Fits rural area style
  • Can be reused for other purposes
Cons of Crushed Stone Driveway
  • Gets very hot during summer
  • Can be messy after many drives
  • Hard to remove snow and ice
Buying crushed stone and installing it on your driveway is as easy as it gets. Similar to other rough materials discussed in this post, only small tools like shovels, dolly and buckets are required to spread it on the road. The cost of crushed stone driveway is between $4 and $6 per square foot from professional local contractors that can finish the job in several days.

5. Brick

The same brick we see being used in wall construction can be installed as top driveway surface. Brick is manufactured by compressing clay with plastic mass. It is heated to extreme temperature and dried up to become as solid as you know it. Pros of Brick Driveway
  • Variety of selections in shapes and shades
  • Bricks are recyclable
  • Slip resistant with rough top part
Cons of Brick Driveway
  • Needs regular maintenance
  • Change color over time
  • Old fashion looking
Installing brick on driveway costs $10 per square foot, which is not too far from masonry brick laying as part of the wall. To save money you can use or purchase old brick, that was part of a wall before. Do not mix these two jobs and contact landscaping professionals instead of masonry contractors that work with bricks.

6. Seashell

This material is popular on the coast line where shells can be found near the water. Construction companies use seashells to add in other materials as well as spread them on driveway in rough condition, without adding anything else. It usually comes in white or pearl color and darkens within year because of mixing with sand and dirt. Pros of Seashell Driveway
  • Environmentally friendly
  • Has natural drainage
  • Creates worm vibe of beach house
Cons of Seashell Driveway
  • Break and crack under light weight
  • Sharp and very hard to walk on
  • Gets stuck in shoes and tires
To deliver and spread seashells on driveways costs below $4, which is only slightly more expensive than rough gravel. As you go further from coast line, cost of material increases due to delivery. This material is elegant and very soft. We recommend adding edge lines with darker color landscape material to create visual path.

7. Gravel

This material is used in other construction mixes and underlayment systems. It’s literally fragments and small crushed stones that are put on top of soil. It is easily spread out by hands and anyone can do it. Pros of Gravel Driveway
  • Cheapest of them all
  • Easy DIY Job
  • Can install another material on top
Cons of Gravel Driveway
  • Needs to be graded very often
  • Will mix with dirt and leaves
  • Washes up with heavy rains
It is rough material and can be purchased in bulk (by metric tons or cubic meters). The cost of driveway with gravel should not exceed $3 per square foot, but you can save tons of money by purchasing materials and doings installation by yourself. You do not require specific tools or heavy equipment for the job and delivery of gravel can be arranged directly to your project.

Conclusion

To properly finish any and all of these driveways requires skills and experience. There is no way you can complete any of these projects without heavy equipment and tools that regular home owner’s just store in their garages. Most of those who will read this post will prefer to install asphalt driveway, because of its popularity and low costs. We want to encourage home owners to go for personal preference and what matches your house, rather than getting the most affordable and popular items. Driveway jobs have to be completed fast; otherwise you will need to park elsewhere while the project is running. To not overpay, ask us for quotation sample on material you prefer in specific region where the work need to be done and our team can provide some numbers.

Leave A Comment