Jack and Jill Bathroom Plans and Meaning of Shared Bathroom
When renovating a house, people think over the future layout based on the needs of their family. And in some cases, they think about installing a shared bathroom. This type of bathroom is suitable for both condo and home. The meaning of shared bathroom is pretty simple, it is the use of one bathroom for tenants from both bedrooms.
The first popular bathroom type has two entrances and is bordered by two bedrooms called Jack and Jill bathroom. Another type of shared bathroom has a connection with a bedroom and a hall. But it should be clear that the shared bathroom has its characteristics in the location. It is worth considering the pros and cons when choosing such a bathroom for your home or condo.
- Example of a Jack and Jill Bathroom
- Jack and Jill Bathroom Plans
- Why Calls Jack and Jill Bathroom
- Differences in installation in Condo and Home
- Benefits of Shared Bathroom
- Features in the Planning and Arrangement of Furniture
- The Inconvenience with a Jack and Jill Bathroom
Let’s take a closer look at each point to make it easier for you to decide whether to install a shared bathroom in your home. What are the pros and cons of this bathroom?
Jack and Jill Bathroom Plans
There are many varieties of Jack and Jill bathroom plans. Since this type of bathroom involves the presence of several people at the same time, it is divided into parts. The most common bathrooms are with two, three, and four pieces. Next, we’ll look at several options for Jack and Jill bathroom plans.
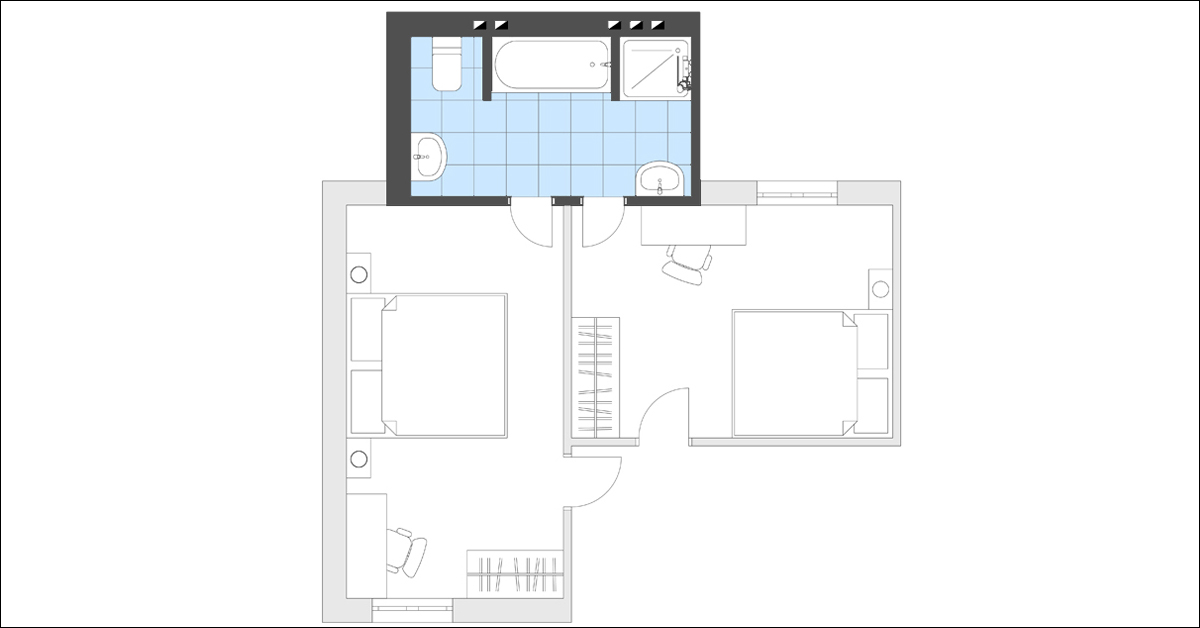
Jack and Jill Bathroom with private shower area.
This Jack and Jill bathroom plan has three parts inside. The main convenience is several things at once. First, there are intermediate doors to the toilet and shower area. This makes it easy to use it without interfering with each other.
The washbasins in the bathroom lobby are opposite each other for added comfort. This is quite convenient, especially when you don’t like to have someone standing to the side and looking at you when you brush your teeth or put on makeup.
It is also important that the Jack and Jill bathroom doors open in the correct direction. The entrance doors must open towards the bedrooms and the internal doors towards the additional rooms. This simple principle will save more space inside the bathroom.
Jack and Jill Bathroom Plan with an open layout.
Although the location of this Jack and Jill bathroom is identical to the bedrooms, it is completely different in layout inside. The first thing that catches your eye is the absence of additional closed parts of the bathroom.
Removing the interior walls freed up more space and added a tub to the bathroom. Visually, there is much more space in the room, but there are also some disadvantages.
Since there is no possibility for privacy, it becomes difficult to use the bathroom at the same time. You can still share hygiene procedures near the sinks. But if someone needs to take a shower, then everyone else will have to leave this room.
This is a great example of a Jack and Jill bathroom plan that uses door locks. By closing from the inside, you will not worry that someone will disturb you while you relax while taking a bath.
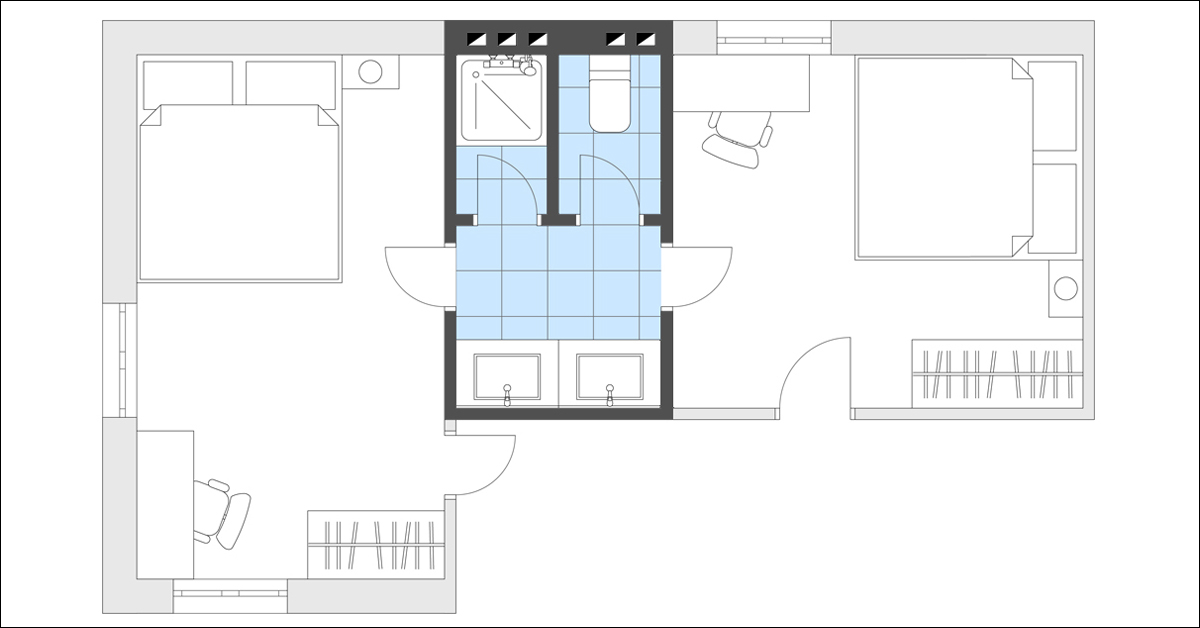
Compact bathroom plan with two vanity tables.
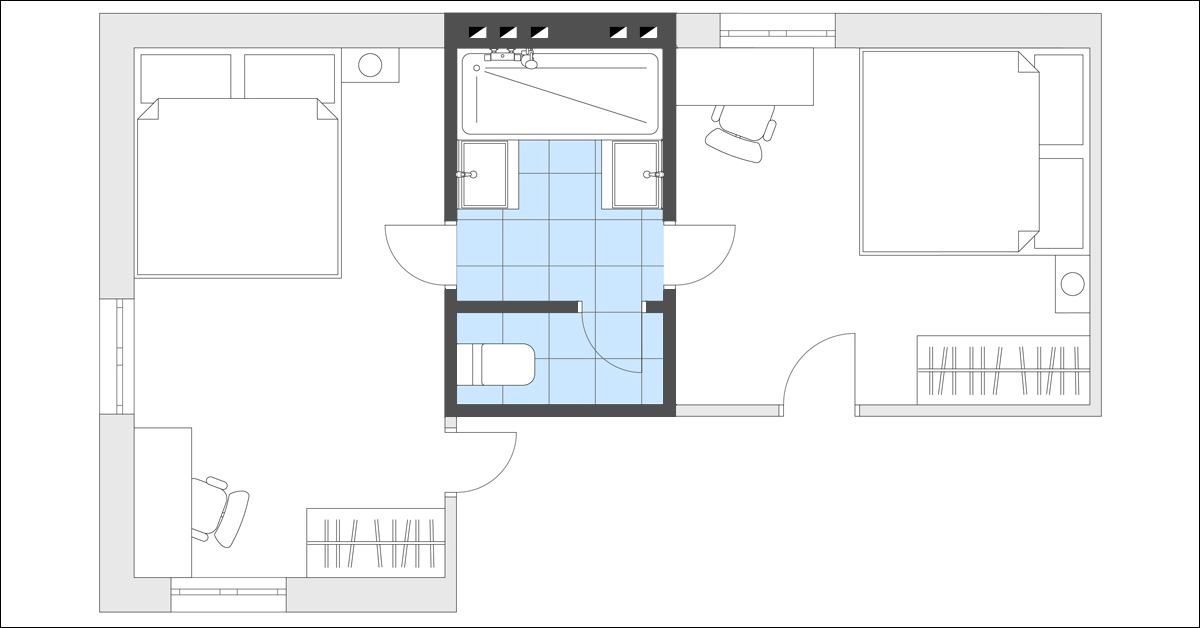
In this example, a more classic Jack and Jill bathroom plan. The entrances from the bedrooms are opposite here. This bathroom also has three parts as in the first version, but due to the location of the area with a shower and toilet, it has a lot of space.
This style can be called classic because such a layout is usually done between children’s bedrooms. Aside from the usually shared bathroom benefits, it allows children to interact more. It will also teach children to share, give in to each other, and calculate their time when the second child is waiting for his turn.
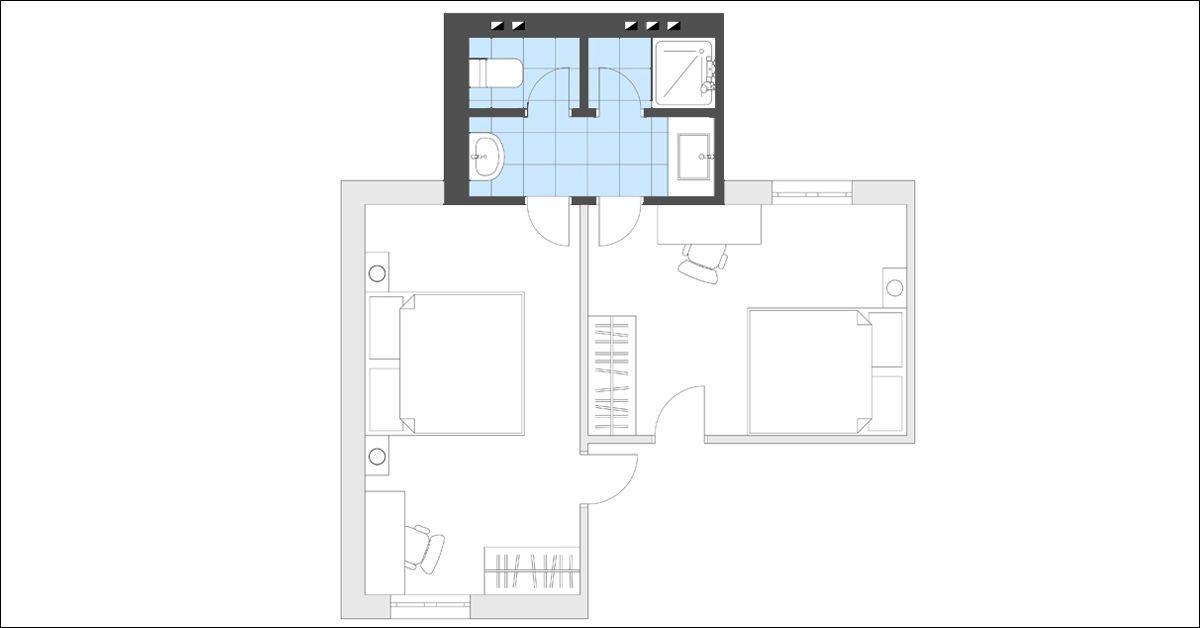
Shared bathroom connected with two bedrooms.
This option looks very similar to the previous one but still has important differences. At first glance, this Jack and Jill bathroom plan does not offer the necessary privacy, but everything can be foreseen.
The division in the bathroom goes into two parts. In the main one, there are two washbasins and a tub, in the other a toilet room. Based on this, problems can only arise when someone is taking a bath or shower. This moment can be smoothed out in two ways.
In the first, install a thick opaque curtain on the bathtub. This will create an element of privacy for privacy and allow other family members to use the shared bathroom at the same time. The main thing is to have an agreement that everyone leaves the room when you finish showering.
The second option is simpler and will not cause problems with the possibility of violating personal space. As in the case of the second layout option, you install locks on the bathroom door.
Example of a Jack and Jill Bathroom

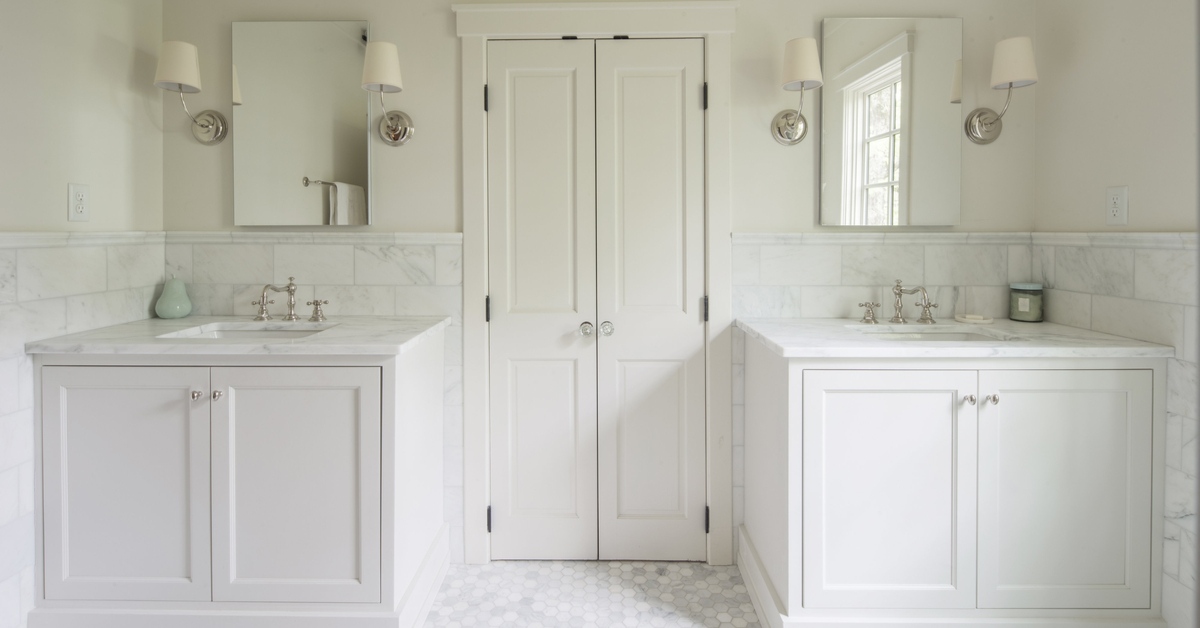
Beautiful Jack and Jill bathroom with separate toilet.
Having discussed all the pros and cons of installing a shared bathroom, let’s look at one example. In this photo, the shared bathroom is located between two bedrooms. Leaving the room you will find yourself in a room with two sinks where it is convenient to brush your teeth and carry out other hygiene procedures. This is also facilitated by a huge mirror located along the entire wall.
It is also worth paying attention to the location of the lockers for storing all the necessary accessories. This space will be enough for two or three people. At the same time, because of the correct placement in the room, everyone has a lot of free space.
The toilet is located behind a separate door to maintain a sense of privacy. In general, this is a convenient layout of a shared room that saves additional space in the house for other rooms.
Why It is Called Jack and Jill Bathroom
As often happens, certain things get their name from popular works. So it happened with Jack and Jill bathroom. The title is taken from a popular poem of the twentieth century, and subsequently the disastrous comedy of 2011.
The verse is about a brother and sister who have separate bedrooms and a shared bathroom between them. The name gained great popularity and this type of shared bathrooms began to be called that way.
Since this type of layout is considered quite popular, they began to use it not only between children’s bathrooms. These bathrooms are especially common in apartments between the parents’ and the child’s bedrooms. This helps to save more space in the apartment and allows the child to learn morning and evening hygiene from their parents.
Differences in Installation for Condo and Home
The first thing to consider before planning a shared bathroom installation is the type of living space. Under normal circumstances, a house is much larger than an apartment. This allows for more varied layouts with bathrooms on different floors.
In the house, you can often find both a master bedroom with a separate bathroom and bathrooms for guests. Because of this feature, different types of the bathroom are installed in houses. It can be a Jack and Jill bathroom or two separate bathrooms. The choice of such a room depends on the number of family members living in the house and personal comfort.
As for the apartments, it’s a little more complicated. If you have one bedroom, then the need for a Jack and Jill bathroom disappears by itself. Usually, 1-2 people live in such apartments and one bathroom is enough.
It’s quite another matter when the apartment has two or more bedrooms. In this case, installing a Jack and Jill bathroom can save you space, unlike two full bathrooms.
If you are in doubt about the possibility of installing such a room, consult with architects. Planning professionals will offer you all possible options for translating your ideas into reality. And even if they recommend that you not install a shared bathroom, then you will have a clear understanding of why this should not be done in your home.
Benefits of Shared Bathroom

Couple brushing teeth in the shared bathroom.
The main benefits that people use to install a shared bathroom are cost and space savings. Bathroom renovations are quite expensive and if there are two or more bathrooms in the house and apartment, the price increases significantly.
The second but no less important factor is the saving of free space. A great example here is a Jack and Jill bathroom or a shared bathroom with entrances from the hallway and hall. This layout will help in small houses or apartments with limited space. It is worth remembering that a properly designed living space design will add additional comfort to residents and even guests.
Don’t worry about a shared bathroom taking away your privacy while you are using it. In such rooms, two-way locks are installed on each of the doors, which allows you to safely perform the necessary procedures. These locks also prevent other family members from entering your bedroom through the shared bathroom. The main thing is not to forget to unlock the locks on the doors after you leave the bathroom, so as not to create an awkward situation.
Features in the Planning and Arrangement of Furniture
Since the shared bathroom is different from the standard bathroom, there are some special features for convenience.
Remodel on point advises you on the best layout for Jack and Jill bathroom. Doors from each bedroom lead to a common area with two or more sinks. And the shower area and toilet are located behind additional doors that are closed from the inside. In this case, people living in each room can brush their teeth or apply cosmetics at the same time. This will reduce the waiting time and get rid of unnecessary locks on the doors.
In addition to sinks, it is also necessary to consider having multiple mirrors and storage spaces for each person living in these two bedrooms. It is also worth making sure that there is enough free space in this part of the bathroom for several people to move and open doors.
If you have any difficulties with how to organize all this, then you can turn to an interior designer who will help you in the correct planning of your shared bathroom.
The Inconvenience with a Jack and Jill Bathroom

The guy looks at the girl who does makeup in the bathroom.
Although we have listed many advantages of installing a Jack and Jill bathroom, there are also disadvantages. The first problem you may encounter in this room is the noise. In most cases, there is a difference in the sleep schedules of the roommates, and hence the bathroom use too. Since the door to the shared bathroom directly leads into the bedroom, you may be disturbed by the noise of a faucet in the sink or a hairdryer when drying your hair.
It is also worth remembering that such a layout can create problems with waiting for your turn to the toilet or shower. In this case, the Jack and Jill bathroom has a clear disadvantage compared to two private baths.
Difficulties in planning such a bathroom can also be attributed to the disadvantages. It is not always easy to carve out space between two bedrooms, and it’s not too small. This room can complicate the layout of the entire house or apartment. And do not forget about the difficulties of allocating storage space for both roommates.
Summarizing Ideas Of Shared Bathroom For Your Home
Let’s summarize all of the above about shared bathrooms. First of all, this is a very interesting idea for a bathroom layout that can help out in certain cases. When installed correctly, it will save you extra space in your home and money during renovations.
But don’t forget that everything has a reverse medal that can cause some discomfort. Someone doesn’t like to wake up early because he hears the noise of a hairdryer or standing in line for the shower late for work.
We hope that we have revealed to you the main features of the Jack and Jill bathroom and you will be able to assess the need for it in your home. Weigh the pros and cons and consult with your contractor. He will gladly advise on how best to deal with the layout of the rooms in your particular case.
latest video
news via inbox
Nulla turp dis cursus. Integer liberos euismod pretium faucibua