Bathroom safety for kids

How to Create Bathroom Safety for Kids

Last Updated: 2021-08-12By

Caring for the well-being of children is very important to parents. We try to keep them safe in everything and the bathroom is no exception. A lot of things we use daily can be harmful if misused.

Since we cannot always keep track of every step of our children, it is worth taking care of their safety. Here is a list of things that will make finding more bathroom safety for kids.

10 Recommendations for Children Safety in Bathroom:

  • Get Rid of Electrical Appliances
  • Use Non-slip Floor and Shower Materials
  • Hide Toxic or Reactive Fluids
  • Store Medicines in the Medicine Cabinet
  • Install Grab Bars in Tub and Shower Doors
  • Create Bathroom without Sharp Edges
  • Choose the Right Non-slip Tile
  • Electrical Plug Covers for all Sockets
  • Prevent taps Opening with Secured Faucets
  • Install Safety Lids for Toilet

Remodeling on point invites you to consider each point in detail and find out what dangers may be hidden in things we are used to.

[instagram-feed]

1.Get Rid of Electrical Appliances

The right use of electrical appliances in bathroom safety for kids is an integral part of the modern world. These can be toothbrushes, hairdryers, razors, and much more. These devices are harmless for adults, but not for children.

Improper use of electrical appliances can cause burns or wounds in children. No one can guarantee that one day your child will not pick up a razor. By imitating their parents, children do not understand that they can harm themselves.

If you have small children in your home, then you should make sure that all electrical appliances are inaccessible. Set aside a separate box for them, preferably at a height where the child cannot reach. You can also use special latches so that the child cannot open it.

2.Use Non-slip Floor and Shower Materials

Children are much more mobile than adults when taking a bath or shower. Falling in the shower can cause serious injury and should be avoided. It is worth taking care that the floor in the shower area or bathroom is not slippery.

While teaching your child you will teach him about safe behavior, but you shouldn’t stop there. Nowadays, many special materials do not slip in water. The rugs made of them will be comfortable for both children and you.

 3.Hide Toxic or Reactive Fluids

Reactive fluids in availability

Keep toxic liquids out of reach.

It is also worth taking care of the correct storage of hygiene products and cosmetics. Many cosmetics and hygiene products are harmful to the body if they enter the stomach. Children are interested in everything, and there should not be liquids in a conspicuous place that they can drink or spill on themselves.

Make it a rule that everything should be under control. Where the child can reach, there should be nothing dangerous to his health.

Everyone understands that the convenience of adults is also important and there are several solutions. For example, storage of hygiene products in a wall-in cabinet above the sink. The child will not get there, and you will not have to search the entire bathroom for the bottle you need.

4.Store Medicines in the Medicine Cabinet

Medicines, like hygiene products, need to be handled correctly. When planning renovations in the bathroom, allocate a special place for them. Most styles use medicine cabinets that look harmonious and are always at hand.

Due to their location, they are inaccessible to children, which means that the child cannot harm himself. If the situation arises that it is not possible to establish a safe storage place for medicine, remove it to another room. Just take what you need with you to the bathtub and store it in a protected place after use.

Remember that the health of children is much more important, and it is not difficult to take these steps to protect them.

5.Install Grab Bars in Tub and Shower Doors

Bathroom safety grab bars

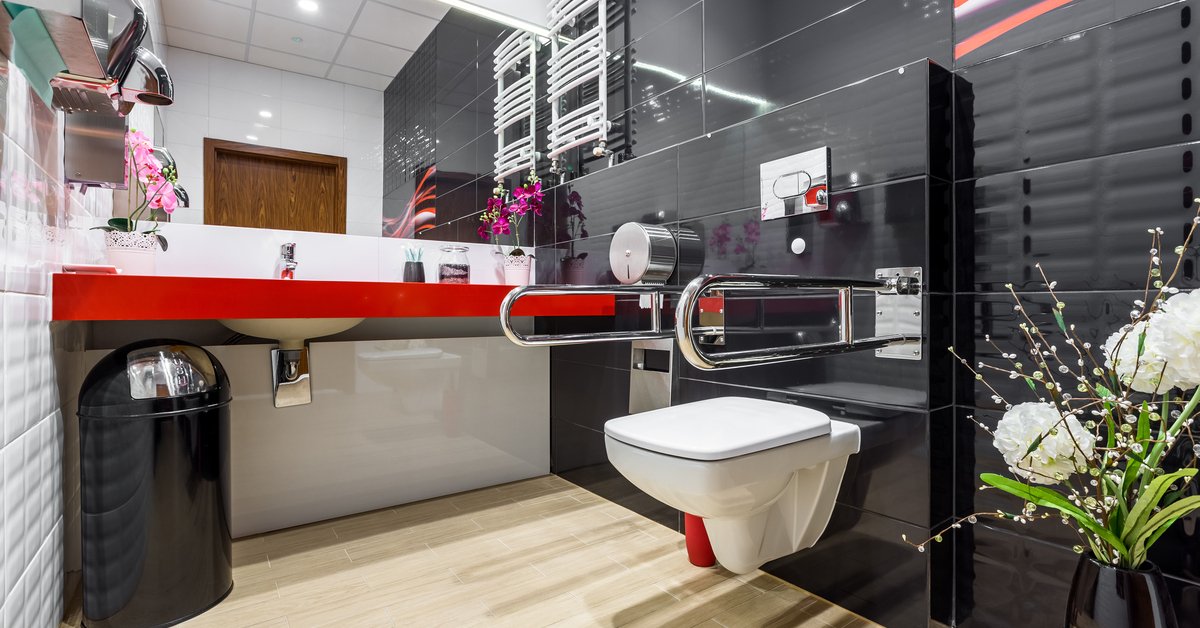
Handrails for safe use of the toilet by a child.

Installing handrails can be useful not only for children but also for adults. It is very convenient when you are taking a bath or shower. The handrails will ensure both yours and the safety of children, which is also important.

6.Create Bathroom without Sharp Edges

When planning a new bathroom safety for kids, think about which style to choose. If you have children, it is preferable to choose a style with fewer sharp edges. Use a rounded shower area layout

You can also choose a semicircular sink. Many elegant bathroom fittings are considered safer for children.

If you have chosen a strict style of furniture, do not get upset and worry. There are special silicone corner protectors. With the help of them, you will protect your child and can give individuality to your furniture.

7.Choose the Right Non-slip Tile

Tiles are the main flooring in the bathroom. This is due to its resistance to water, which is sometimes very abundant in the bathroom. The materials from which it can be made differently, and it is worth choosing less slippery ones.

Take a closer look at natural stone tiles. Its natural texture can be slightly roughened for less slip. Moving on such a tile, when it is wet, you will not feel like on ice.

If you don’t plan on doing renovations anytime soon, you can use special bathroom rugs. They are pleasant to the touch and perfectly absorb moisture. Even after long splashing in the bathroom, your child will be able to move around without slipping.

8.Electrical Plug Covers for all Sockets

Electrical plug covers

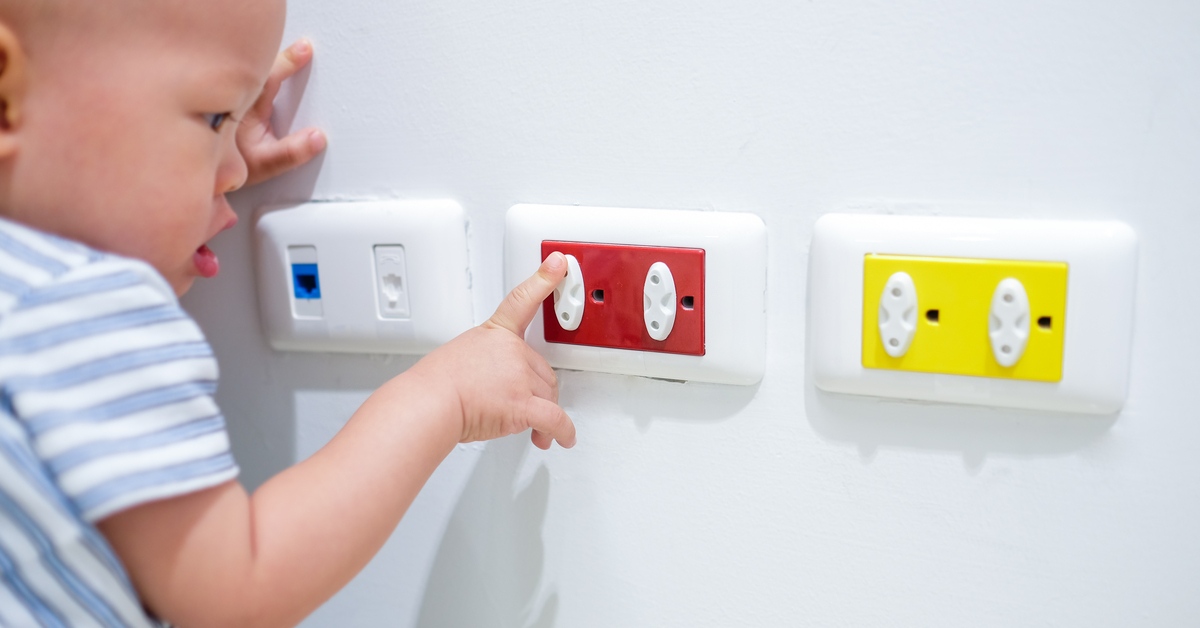
Protect electrical outlets in the bathroom.

We’ve already recommended that you be careful with electrical appliances, but don’t forget about the power supply points. Make sure that special protective covers are installed on electrical outlets.

This device will protect children from electric shock because children love to touch everything they can reach with their fingers. Also, the outlets will be protected from direct water ingress. This is certainly not one hundred percent protection, but the chance of shorting the wires will be minimized.

9.Prevent taps Opening with Secured Faucets

A great bathroom solution is to install secured faucets. This type of crane is rather difficult for a small child. This small improvement will prevent you from accidentally opening the tap. With taps tightly closed, you will avoid accidental flooding that you might not like.

10.Install Safety Lids for Toilet

Someone would not want to see his little child splashing around in the toilet. Protection from harmful bacteria is important at such an early age. There are special tools to help you do this.

Special locks for the toilet lid or fasteners blocking its opening. Such a trifle installed on the lid will make it impossible for a child to fall into the toilet. Also, he will not be able to throw any garbage or things there.

The main function of these devices is to protect the child from injury and to reduce potential risks to the healthy growth of the child. Remember that not all threats can be seen and you need to know about it.

Conclusion about Bathroom Safety for Kids

The safe stay of children in the home should be one of the most important rules for each parent. Keep all electrical appliances and hygiene products out of the reach of children. Make the most bathroom safety for kids and comfortable stay in it for their health and your peace of mind.

On Point Remodeling has provided some tips on how to get it all set up. Perhaps you have already seen some of this information from your friends, but something has become new information for you. If you think that this topic will be useful to your friends, be sure to share it.

editor's pick

latest video

news via inbox

Nulla turp dis cursus. Integer liberos  euismod pretium faucibua

Each building has some sort of driveway or at least should have. The main reason is for vehicles to come closer without need to walk all the way. Some homes are residential with small driveway for their car to come in and park before garage or front entrance, and others can be large commercial buildings with loading docks, delivery entrances and casual parking entrances. On Point Remodeling was asked for suggestions on residential driveway for new home construction, and we decided to write detailed article for all our readers. Using this guide you can select the material for your driveway and see what works for your budget. Here are the materials for driveway we will be discussing in our guide:
  • Asphalt
  • Concrete
  • Paver Stone
  • Crushed stone
  • Brick
  • Seashell
  • Gravel
To find good contractor for your driveway, you can either ask our team by email or try to find someone local that worked with neighbors or nearby buildings.

Installation process of any material surface on your driveway

a) Demolition and Excavation – Before anything is done, your contractor will get heavy machinery and scratch off old layer of driveway. They need to go down at least 5-6 inches to insure proper layering before your final layer of material is installed. b) Material Purchase and Delivery – At this point your contract is signed and you already know how the surface will look. Contracting company purchases necessary materials and delivers them to site. Double check if material is correct and not damaged. c) Preparation of Sublevel – Whatever you place as final material, it cannot just be installed directly on top soil. Gravel is the first choice of material that goes down at this stage. Other preferred material is screen sand that can go on top of gravel and works better with stone and bricks. d) Compaction of Ground – To prevent your driveway from moving and changing shapes, all the layers from bottom up have to be properly compacted. Do not leave any spot untouched while doing this or you can get small holes and cracks in driveway after installation. E) Final Installation – This is when all the magic happens. After all preparations and dirty work the final installation is made literally within hours and you can enjoy new driveway. Stone and brick is set up by hand, while other materials require some sort of machinery with manual labor to even out surface.

1. Asphalt

Probably the most used material for road top surfaces as well as driveways is asphalt. This is a mix of gravel and sand that is mixed in and combined by asphalt cement with crude oil. Pros of Asphalt Driveway
  • Very popular and easy to find materials/contractor
  • Completed in 1 day and you can drive on it after
  • Patches and small holes can be fixed fast
Cons of Asphalt Driveway
  • Easy to damage and cracks appear in few years
  • Almost everyone else has same surface
  • Oily surface and chemicals used in mix
Prepared for asphalt driveway will cost you around $5 per square foot to finish. The contractors that take care of entire process from taking out old driveway surface, install subsurface and compact the ground with new asphalt on top, will charge on average $5500 per regular size driveway at single home property.

2. Concrete

What we call concrete is a mixture of Portland cement, aggregate as well as sand with gravel. Suggested thickness of concrete for driveway is 6 inches. The mixture needs to cure without being touched or driven on top for several days. Pros of Concrete Driveway
  • Durable material for large weights
  • Long lifespan if installed properly
  • Winter and summer friendly
Cons of Concrete Driveway
  • Has marks and stains over time
  • Hard to repair without replacement
  • Super hard to DIY
To hire contractors for concrete driveway it will cost around $7-$9 per square foot. This will include site preparation with gravel spread and new concrete installation. They will order full truck of concrete (or several for larger driveways) to pour inside forming. Smoothening and curing is required after installation.

3. Paver Stone

The most luxurious material that you can use to create driveway path with is paver stone. It is made out of natural stone with uneven rough shapes that have different line patterns. Paver stones are very heavy and are perfect for weights on top of them. Almost every city in Europe has roads and walks made out of stone that were installed centuries ago. Pros of Paver Stone Driveway
  • Creative designs can be done
  • Personal looks, can match the house
  • Can replace single stone in minutes
Cons of Paver Stone Driveway
  • Weeds growing through
  • Stone can move over time
  • Most expensive material
There is wide selection of stone that can be purchased for your driveway. On average we recommend settling with $17-$20 per square foot for stone with installation included. Working with this material is very intense labor and we recommend hiring professionals that do this type of work every day.

4. Crushed Stone

Our readers sometimes mistake crushed stone with gravel, but this is not the same material. Crushed stone material is achieved when machine is mechanically crushing larger pieces of unused stone for this specific purpose. It is larger than gravel and can have smooth finish. Crushed stone can also have a mix of colors, which is much pleasant to eyes than gravel. Pros of Crushed Stone Driveway
  • Low maintenance required
  • Fits rural area style
  • Can be reused for other purposes
Cons of Crushed Stone Driveway
  • Gets very hot during summer
  • Can be messy after many drives
  • Hard to remove snow and ice
Buying crushed stone and installing it on your driveway is as easy as it gets. Similar to other rough materials discussed in this post, only small tools like shovels, dolly and buckets are required to spread it on the road. The cost of crushed stone driveway is between $4 and $6 per square foot from professional local contractors that can finish the job in several days.

5. Brick

The same brick we see being used in wall construction can be installed as top driveway surface. Brick is manufactured by compressing clay with plastic mass. It is heated to extreme temperature and dried up to become as solid as you know it. Pros of Brick Driveway
  • Variety of selections in shapes and shades
  • Bricks are recyclable
  • Slip resistant with rough top part
Cons of Brick Driveway
  • Needs regular maintenance
  • Change color over time
  • Old fashion looking
Installing brick on driveway costs $10 per square foot, which is not too far from masonry brick laying as part of the wall. To save money you can use or purchase old brick, that was part of a wall before. Do not mix these two jobs and contact landscaping professionals instead of masonry contractors that work with bricks.

6. Seashell

This material is popular on the coast line where shells can be found near the water. Construction companies use seashells to add in other materials as well as spread them on driveway in rough condition, without adding anything else. It usually comes in white or pearl color and darkens within year because of mixing with sand and dirt. Pros of Seashell Driveway
  • Environmentally friendly
  • Has natural drainage
  • Creates worm vibe of beach house
Cons of Seashell Driveway
  • Break and crack under light weight
  • Sharp and very hard to walk on
  • Gets stuck in shoes and tires
To deliver and spread seashells on driveways costs below $4, which is only slightly more expensive than rough gravel. As you go further from coast line, cost of material increases due to delivery. This material is elegant and very soft. We recommend adding edge lines with darker color landscape material to create visual path.

7. Gravel

This material is used in other construction mixes and underlayment systems. It’s literally fragments and small crushed stones that are put on top of soil. It is easily spread out by hands and anyone can do it. Pros of Gravel Driveway
  • Cheapest of them all
  • Easy DIY Job
  • Can install another material on top
Cons of Gravel Driveway
  • Needs to be graded very often
  • Will mix with dirt and leaves
  • Washes up with heavy rains
It is rough material and can be purchased in bulk (by metric tons or cubic meters). The cost of driveway with gravel should not exceed $3 per square foot, but you can save tons of money by purchasing materials and doings installation by yourself. You do not require specific tools or heavy equipment for the job and delivery of gravel can be arranged directly to your project.

Conclusion

To properly finish any and all of these driveways requires skills and experience. There is no way you can complete any of these projects without heavy equipment and tools that regular home owner’s just store in their garages. Most of those who will read this post will prefer to install asphalt driveway, because of its popularity and low costs. We want to encourage home owners to go for personal preference and what matches your house, rather than getting the most affordable and popular items. Driveway jobs have to be completed fast; otherwise you will need to park elsewhere while the project is running. To not overpay, ask us for quotation sample on material you prefer in specific region where the work need to be done and our team can provide some numbers.

Leave A Comment