Cork flooring installation process

Installation of Cork Flooring with Pros and Cons at Home

Last Updated: 2021-08-11By

Alternative type of flooring surface that is rare in average home is cork. We rarely think about it and many of us didn’t even know it could be used as a flooring material at home.

Cork floors are getting popular in United States because of its quality and advantages over traditional hardwood or tiles. This green and reusable material is very durable but soft at the same time. It can work as an insulator as well as cozy flooring surface, which many home owners are starting to fall in love with.

Although thinner layer of cork matts can be used as sound and thermal underlayment for hardwood floors, we encourage our readers to read this post and see pros and cons of cork flooring as actual surface at home.

Here are some points we wanted to cover in this post:

  • Pros and Cons of Cork Flooring Material
  • Cork Floor Installation Cost and Comparison
  • Installation Process
  • Where to Buy This Material
  • History and Use of Cork Flooring
[instagram-feed]

Tell us more if you have this type of floors at your home. Remodel On Point would love to share your story with our readers.

Pros and cons

Cork flooring installed in kitchen

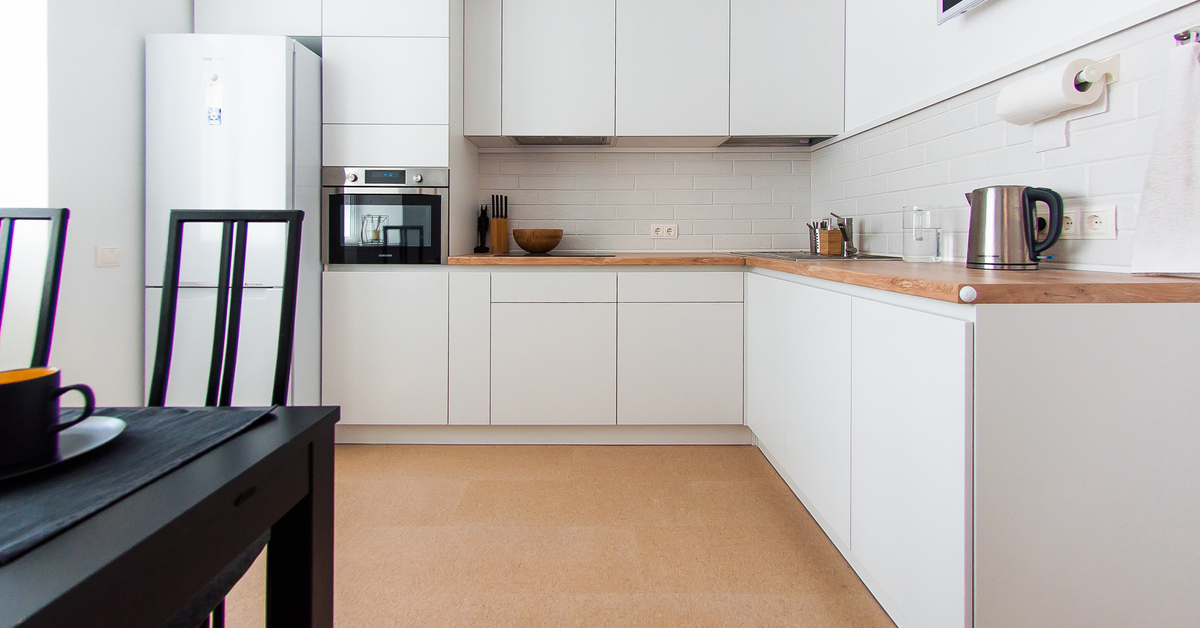
Pros and cons of cork flooring in the house.

To understand if this type of floor is suitable for your home, Remodel On Point created a list of cork flooring pros and cons. Physical qualities and other factors that some home owners may like, while others have different preference.

Cons

Hard to Clean – this material easily absorbs dirt and liquids, thus making it that much harder to clean. Unlike hardwood or tiles, cork floors have spores and may act like sponge.

Not Popular – you may be researching this topic, but cork is not as popular and widely available as other floors. Finding suppliers and installers for it may be a challenge. Matching later on for fixes is even harder.

Easy to Damage – in addition to stains, cork flooring’s another disadvantage is being soft material. Pets can scratch or even tear it up in pieces. Moving furniture can leave marks behind.

Changes Color – within time the top layer of cork floor changes color. Even in perfect condition it will fade in few places while other spots may become slightly darker.

Maintenance – although it’s not hard or costly to maintain corks, the work has to be performed very often. To keep it in good condition, cleaning, sealants and refinishing is required at least once a year.

Pros

Easy to Install – if you cannot find contractor for installation of want to save some money, cork floors are easy to do on your own. With our help and manufacturer’s instructions every home owner should be able to install cork floors in few days.

Eco-Friendly – materials used for manufacturing are eco-friendly or as some call it green. Disposal after demolition is also directly into recycling.

Reduces Noise – cork floors act as sound barrier and absorb noise very well. We often see cork matts installed even as sub layer for hardwood to sound insulate and reduce noise between floors.

Heat Insulator – this type of material is definitely one of the nicest to walk on. It is super cozy and pleasant to touch. It never gets cold like tiles and does not react to change of temperature like hardwood.

Easy to Replace or Maintain – In case you decide to replace newly installed cork floors it won’t take long time or be costly. Simply remove everything from subfloor and put whatever you feel necessary.

Cork Flooring Cost per Square Foot – Compared to Other floors

The biggest question that builders and home owners ask is how much does it cost. We always say that practicality is the main factor but nevertheless everyone has budget in mind they are willing to spend.

The average cost for cork flooring material is $6.2 per square foot. In America contractors charge $3 for installation of cork floors with prep work and cleanup.

It is one of the easiest materials to install of the floor, but contractors increase their prices simply because there aren’t many people that deal with cork materials. Its supply and demand game, and contractors/installers win here.

Putting together costs cork flooring cost per square foot and comparing different floor types we can see that cork floors are not the most expensive. Tiles and engineered hardwood have way more expensive options, but laminate, vinyl and carpet can be on cheaper side.

How to Install New Flooring with Cork Material

Worker installing cork floors in basement

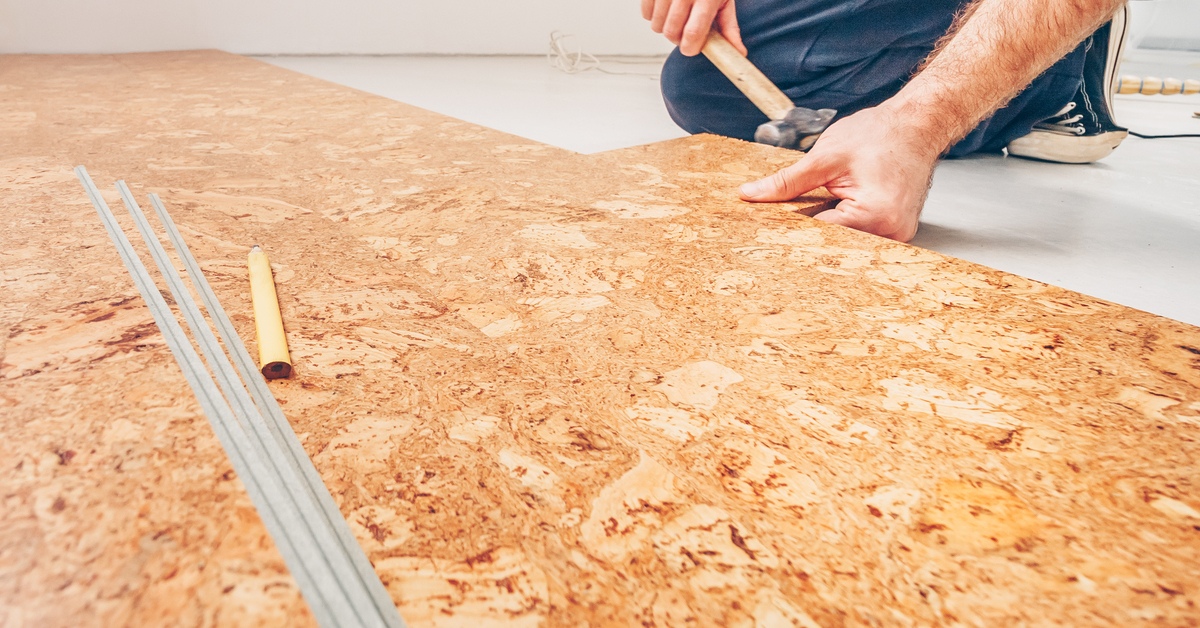
The installation method for cork floors in the basement.

We honestly think that installation of cork floors is one of the easiest if not easiest comparing to other materials. Many home owners decide to install cork flooring on their own and save money on contractors. Only few tools are required for work and you can finish a large area in several days.

Before anything gets installed on subfloor contractors always check the level and cleanliness. Walk around the rooms and make sure that no nails stick out or drops of plaster tuck to plywood. Final cleanup and weeping of the floor is mandatory to make sure there won’t be any bumps.

First of all figure out what type of cork will be used on the floor. Typically there are three different shapes used in residential homes.

Wood Looking Tiles – work exactly like laminate floors. It has a click connection although tiles are larger size. Simply click them together and tap with rubber hammer. Install next to the wall and leave very small gaps to cover later on with baseboards. Because tiles are large, installers like to add a little of glue to the bottom. It prevents floors from sliding and separating.

Square Tiles – the idea is very similar to rubber square mats used in home gyms. They have grove connection or so called tooth edges. These cork floors are connected one to another and very rarely secured to subfloor.

Matts or Rolls – installation of cork here is very different. It may be similar to carpet in a way, but instead on nailing it contractors prefer glue. Make sure to connect the edges perfectly or it will look horrible. We always suggest using nontoxic glue for all renovation projects.

Where to Buy – Local Suppliers vs Online

In this topic we have already mentioned that most of production of cork is in Europe but America is catching up really fast.

Finding local supplier with quality material and reasonable prices is the best option. For buyers it means a lot if they can visit the store and hold the product in hand before paying thousands of dollars for order. This however is a unique material and smaller cities would not have it.

Regional or national floor suppliers are the second option from home owners. You want to make sure reputable company within the country stands behind the order and there is someone you can call in case things go south. In the battle of cork flooring pros and cons, local suppliers always get more advantage.

Cork floors are widely available through online purchasing, but it is the last source we recommend going with. Biggest issues contractors and builders mention are returns and damages of product. Its almost impossible to return a container of floors that seem different from what was ordered through online.

History of Cork Floors

Cork was popular construction material in Europe during 13th-15th centuries. It was used as layer of insulation in ships, construction thermal material and in other implementation. Although it was hard to harvest, the qualities of cork were largely appreciated and many started experimenting with it.

Mass production was still not cheap and cork was used only for necessary construction that could not be supplemented with other materials. We know that few wealthy individuals in Europe had cork floors in separate rooms during 16th – 17th century. It was not practical, but extremely fancy at the time.

Fancy cork floors became popular material for homes in 20th century. In colder countries and regions it was one of the ways to make insulated and slightly warmer floor surface. Even now we see cork being used in remote rooms more than in entire houses.

editor's pick

latest video

news via inbox

Nulla turp dis cursus. Integer liberos  euismod pretium faucibua

Each building has some sort of driveway or at least should have. The main reason is for vehicles to come closer without need to walk all the way. Some homes are residential with small driveway for their car to come in and park before garage or front entrance, and others can be large commercial buildings with loading docks, delivery entrances and casual parking entrances. On Point Remodeling was asked for suggestions on residential driveway for new home construction, and we decided to write detailed article for all our readers. Using this guide you can select the material for your driveway and see what works for your budget. Here are the materials for driveway we will be discussing in our guide:
  • Asphalt
  • Concrete
  • Paver Stone
  • Crushed stone
  • Brick
  • Seashell
  • Gravel
To find good contractor for your driveway, you can either ask our team by email or try to find someone local that worked with neighbors or nearby buildings.

Installation process of any material surface on your driveway

a) Demolition and Excavation – Before anything is done, your contractor will get heavy machinery and scratch off old layer of driveway. They need to go down at least 5-6 inches to insure proper layering before your final layer of material is installed. b) Material Purchase and Delivery – At this point your contract is signed and you already know how the surface will look. Contracting company purchases necessary materials and delivers them to site. Double check if material is correct and not damaged. c) Preparation of Sublevel – Whatever you place as final material, it cannot just be installed directly on top soil. Gravel is the first choice of material that goes down at this stage. Other preferred material is screen sand that can go on top of gravel and works better with stone and bricks. d) Compaction of Ground – To prevent your driveway from moving and changing shapes, all the layers from bottom up have to be properly compacted. Do not leave any spot untouched while doing this or you can get small holes and cracks in driveway after installation. E) Final Installation – This is when all the magic happens. After all preparations and dirty work the final installation is made literally within hours and you can enjoy new driveway. Stone and brick is set up by hand, while other materials require some sort of machinery with manual labor to even out surface.

1. Asphalt

Probably the most used material for road top surfaces as well as driveways is asphalt. This is a mix of gravel and sand that is mixed in and combined by asphalt cement with crude oil. Pros of Asphalt Driveway
  • Very popular and easy to find materials/contractor
  • Completed in 1 day and you can drive on it after
  • Patches and small holes can be fixed fast
Cons of Asphalt Driveway
  • Easy to damage and cracks appear in few years
  • Almost everyone else has same surface
  • Oily surface and chemicals used in mix
Prepared for asphalt driveway will cost you around $5 per square foot to finish. The contractors that take care of entire process from taking out old driveway surface, install subsurface and compact the ground with new asphalt on top, will charge on average $5500 per regular size driveway at single home property.

2. Concrete

What we call concrete is a mixture of Portland cement, aggregate as well as sand with gravel. Suggested thickness of concrete for driveway is 6 inches. The mixture needs to cure without being touched or driven on top for several days. Pros of Concrete Driveway
  • Durable material for large weights
  • Long lifespan if installed properly
  • Winter and summer friendly
Cons of Concrete Driveway
  • Has marks and stains over time
  • Hard to repair without replacement
  • Super hard to DIY
To hire contractors for concrete driveway it will cost around $7-$9 per square foot. This will include site preparation with gravel spread and new concrete installation. They will order full truck of concrete (or several for larger driveways) to pour inside forming. Smoothening and curing is required after installation.

3. Paver Stone

The most luxurious material that you can use to create driveway path with is paver stone. It is made out of natural stone with uneven rough shapes that have different line patterns. Paver stones are very heavy and are perfect for weights on top of them. Almost every city in Europe has roads and walks made out of stone that were installed centuries ago. Pros of Paver Stone Driveway
  • Creative designs can be done
  • Personal looks, can match the house
  • Can replace single stone in minutes
Cons of Paver Stone Driveway
  • Weeds growing through
  • Stone can move over time
  • Most expensive material
There is wide selection of stone that can be purchased for your driveway. On average we recommend settling with $17-$20 per square foot for stone with installation included. Working with this material is very intense labor and we recommend hiring professionals that do this type of work every day.

4. Crushed Stone

Our readers sometimes mistake crushed stone with gravel, but this is not the same material. Crushed stone material is achieved when machine is mechanically crushing larger pieces of unused stone for this specific purpose. It is larger than gravel and can have smooth finish. Crushed stone can also have a mix of colors, which is much pleasant to eyes than gravel. Pros of Crushed Stone Driveway
  • Low maintenance required
  • Fits rural area style
  • Can be reused for other purposes
Cons of Crushed Stone Driveway
  • Gets very hot during summer
  • Can be messy after many drives
  • Hard to remove snow and ice
Buying crushed stone and installing it on your driveway is as easy as it gets. Similar to other rough materials discussed in this post, only small tools like shovels, dolly and buckets are required to spread it on the road. The cost of crushed stone driveway is between $4 and $6 per square foot from professional local contractors that can finish the job in several days.

5. Brick

The same brick we see being used in wall construction can be installed as top driveway surface. Brick is manufactured by compressing clay with plastic mass. It is heated to extreme temperature and dried up to become as solid as you know it. Pros of Brick Driveway
  • Variety of selections in shapes and shades
  • Bricks are recyclable
  • Slip resistant with rough top part
Cons of Brick Driveway
  • Needs regular maintenance
  • Change color over time
  • Old fashion looking
Installing brick on driveway costs $10 per square foot, which is not too far from masonry brick laying as part of the wall. To save money you can use or purchase old brick, that was part of a wall before. Do not mix these two jobs and contact landscaping professionals instead of masonry contractors that work with bricks.

6. Seashell

This material is popular on the coast line where shells can be found near the water. Construction companies use seashells to add in other materials as well as spread them on driveway in rough condition, without adding anything else. It usually comes in white or pearl color and darkens within year because of mixing with sand and dirt. Pros of Seashell Driveway
  • Environmentally friendly
  • Has natural drainage
  • Creates worm vibe of beach house
Cons of Seashell Driveway
  • Break and crack under light weight
  • Sharp and very hard to walk on
  • Gets stuck in shoes and tires
To deliver and spread seashells on driveways costs below $4, which is only slightly more expensive than rough gravel. As you go further from coast line, cost of material increases due to delivery. This material is elegant and very soft. We recommend adding edge lines with darker color landscape material to create visual path.

7. Gravel

This material is used in other construction mixes and underlayment systems. It’s literally fragments and small crushed stones that are put on top of soil. It is easily spread out by hands and anyone can do it. Pros of Gravel Driveway
  • Cheapest of them all
  • Easy DIY Job
  • Can install another material on top
Cons of Gravel Driveway
  • Needs to be graded very often
  • Will mix with dirt and leaves
  • Washes up with heavy rains
It is rough material and can be purchased in bulk (by metric tons or cubic meters). The cost of driveway with gravel should not exceed $3 per square foot, but you can save tons of money by purchasing materials and doings installation by yourself. You do not require specific tools or heavy equipment for the job and delivery of gravel can be arranged directly to your project.

Conclusion

To properly finish any and all of these driveways requires skills and experience. There is no way you can complete any of these projects without heavy equipment and tools that regular home owner’s just store in their garages. Most of those who will read this post will prefer to install asphalt driveway, because of its popularity and low costs. We want to encourage home owners to go for personal preference and what matches your house, rather than getting the most affordable and popular items. Driveway jobs have to be completed fast; otherwise you will need to park elsewhere while the project is running. To not overpay, ask us for quotation sample on material you prefer in specific region where the work need to be done and our team can provide some numbers.

Leave A Comment