9 Typical Master Bathroom Sizes and Layouts
Master bathroom sizes and layouts have several distinctive characteristics. First of all, it differs in that it can be accessed from the master bedroom. Also, the average master bathroom size is significantly larger in comparison with a regular bathroom, in the range of 40-100 sq. ft.
Because of its large size, the master bathroom can be much more comfortable. In it, you do not have to worry about the lack of free space. This allows you to show your imagination in the arrangement of both the main and additional furniture and plumbing. Local companies like Easy Renovations can help with custom or more complicated layouts. It is time to upgrade medical spa office or home bathroom.
Remodel on point has selected 9 different master bathroom layouts for you, which are used in houses of different plans. Let’s take a closer look at each of them so that you have an idea of what is best to use in your home.
11×11 Square Bathroom with Lots of Open Space
As we said, master bathroom sizes and layouts may vary depending on the size of your home. First of all, we will consider bathrooms with a square plan or close to this. They are very easy to place in the house due to their even size.
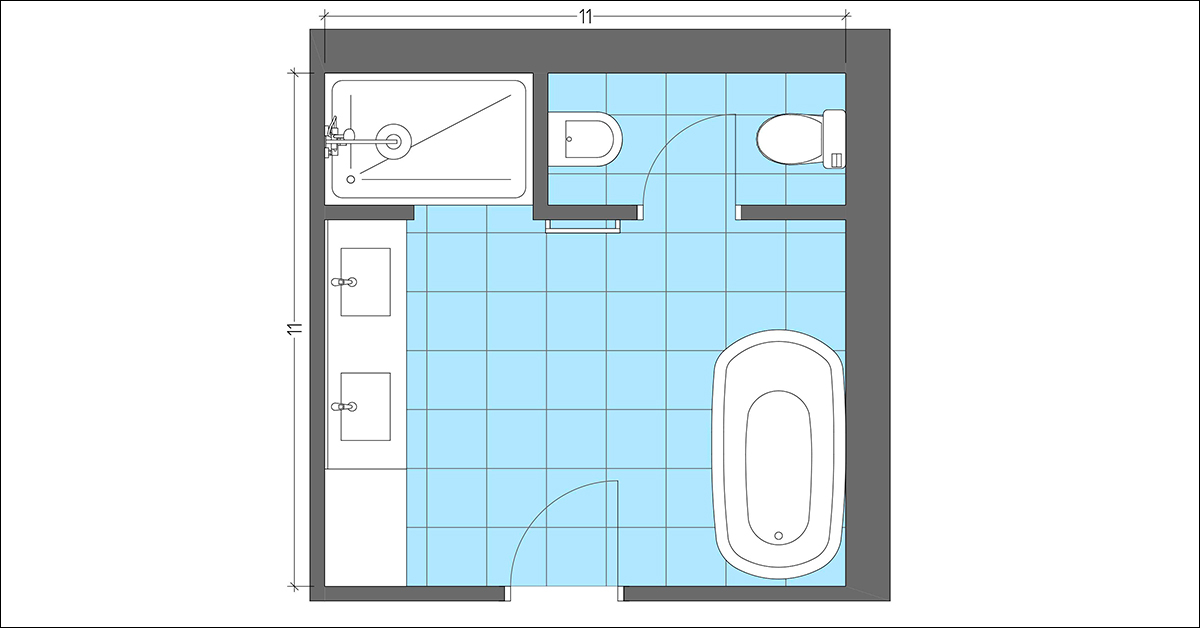
This drawing shows an 11×11 master bathroom plan. A lot of free space allows you not to worry about which way the doors will open. And we recommend installing them with the opening towards the inside of the bathroom. This will avoid taking up extra space in your bedroom.
This plan contains all the necessary elements used for hygiene. To the left of the entrance are cabinets with sinks, which allow you to conveniently use them immediately by going into the bathroom.
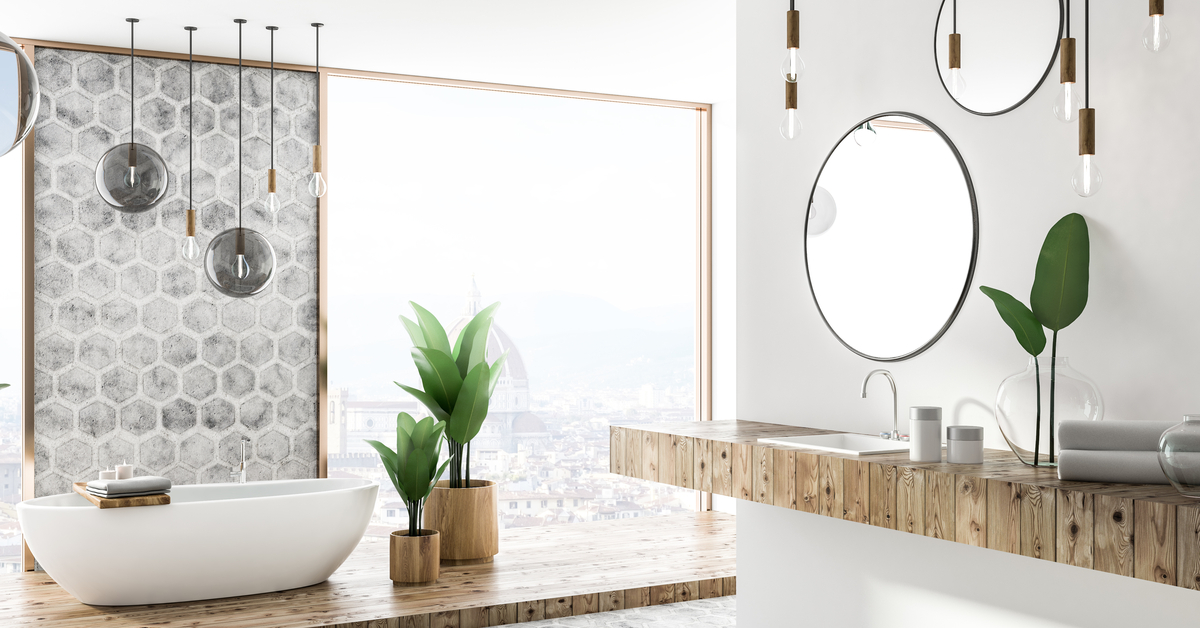
[instagram-feed]A stand-alone tub is located on the opposite wall. It is very easy to use, but you can also replace it with a more standard built-in bathtub. It depends on your preferences, but the standalone tub looks much more elegant. A shower room and a bathroom are located at the back of the room. They are separated by walls to create a more private environment.
This layout is aimed at convenience in the simultaneous use of the master bathroom by two people. You can jointly brush your teeth and perform hygiene procedures using two sinks. This is also facilitated by the fencing of the shower area and toilet bowl.
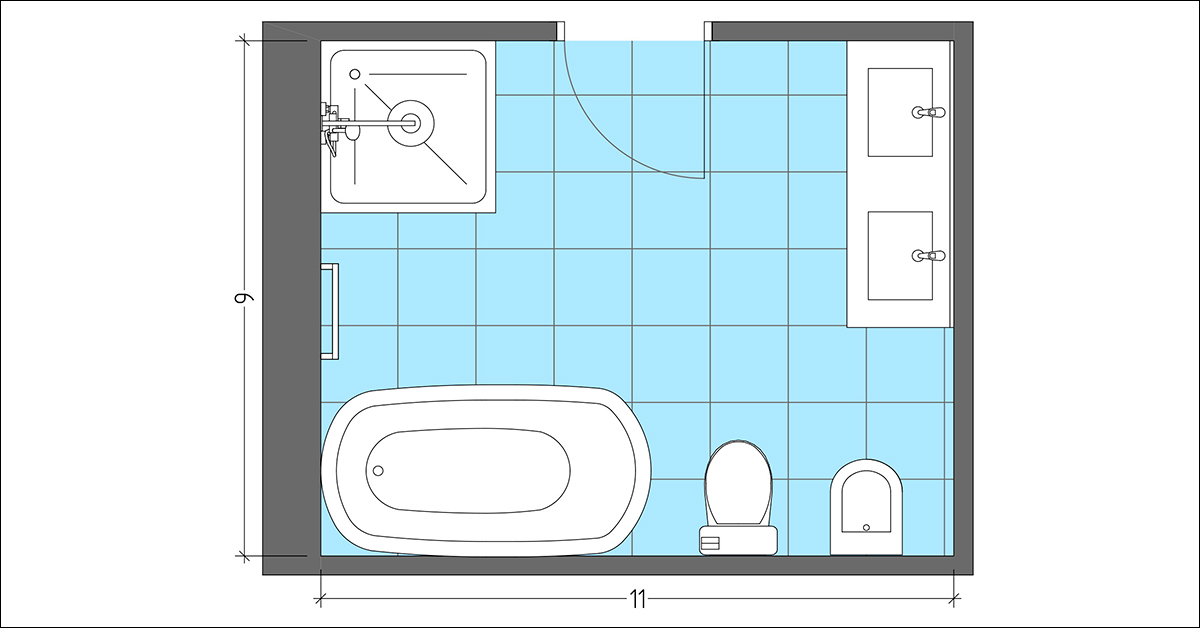
Master Bathroom with Bathtub in the Center

The next master bathroom option also measures 11×11 feet. In addition to the size, the layout of the bathroom in this example is practically all different from the previous one. If in the previous example the free space was focused in the center of the room, then in this case it divides the room into functional parts.
Entering the room, you can immediately move in the direction you need. To the left of the entrance are the shells because they are used very often throughout the day. In the center of the room, there is a stand-alone tub that makes it very convenient to take a bath. This is because you have access to it from almost all sides.
We also have easy access to the toilet directly from the door, which is very convenient. As in the previous plan, it is located behind the wall for more comfort. Another difference is that this layout does not plan to have a bidet. The shower area is still located in the opposite corner from the door and is fenced off by a wall.
Although this layout promotes the sharing of the master bathroom, it is still aimed at those who like to soak in the bath. The location of the stand-alone tub plays a central role, which means that it will be used frequently. If you do not like spending time lying in hot water for a long time, then perhaps you should consider other options for master bathroom layouts.
11×10 Bathroom with Separated Parts
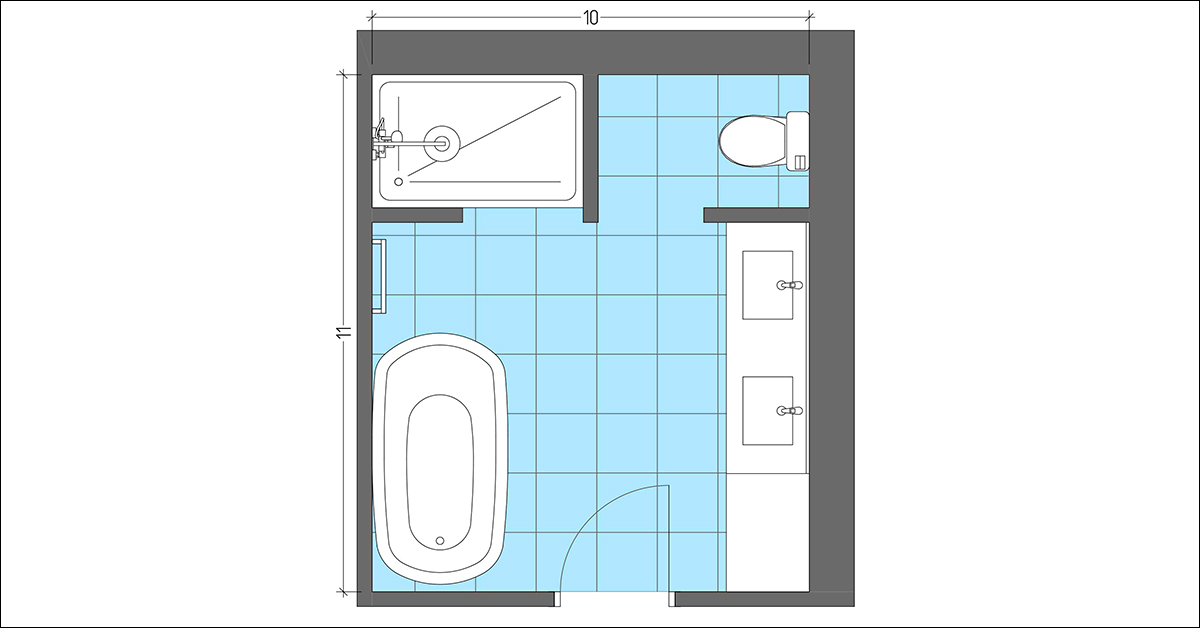
In the next photo drawing, we can see a typical master bathroom size 11×10. This room will have a little less space, but it will still be spacious. If you look at the picture, you will understand that the entire space of the room is being used for its intended purpose.
The room is divided into four parts. There is a bathtub to the left of the door, we remind you that it can be either a bathtub in a niche or a stand-alone tub. To the right of the door is the area for hygiene procedures. Here you can see sinks and cabinets for storing all the necessary hygiene items.
The back of the room is divided into two walled niches. In one of them there is a shower room and in the second a toilet. Professional designers recommend placing the toilet closer to the sinks, in this type of master bathroom layout. This allows for quick access to the sink, allowing you to conveniently wash your hands before and after using the toilet.
As we can understand, this is a very practical layout. And while its dimensions still exceed the average master bathroom size, it can quite easily fit into medium-sized houses or more.
10×10 Master Bathroom Layout for Easy Sharing
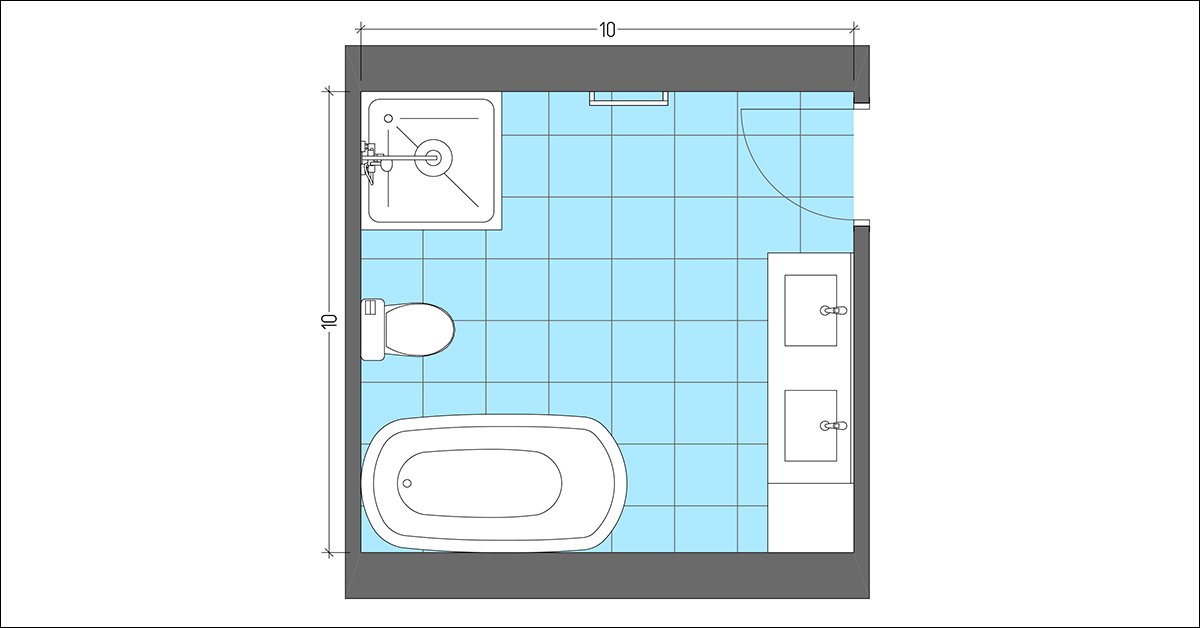
10×10 master bathroom size is considered the maximum value for the average size of this type of bathroom. The square shape of this layout guarantees you plenty of free space in the center of the room.
In this drawing, we see that the main elements of the bathroom are located along the far wall. The bath and shower are separated by the area in which the toilet is located. Along the wall near the door are vanities and a storage cabinet.
Due to the lack of additional separation by walls, this master bathroom option is more focused on single-use. However, because of the installed two sinks, you will not have problems with the queue during the morning hygiene procedures. You will be able to brush your teeth and wash your face together before going to work.
Average Master Bathroom Size 10×9
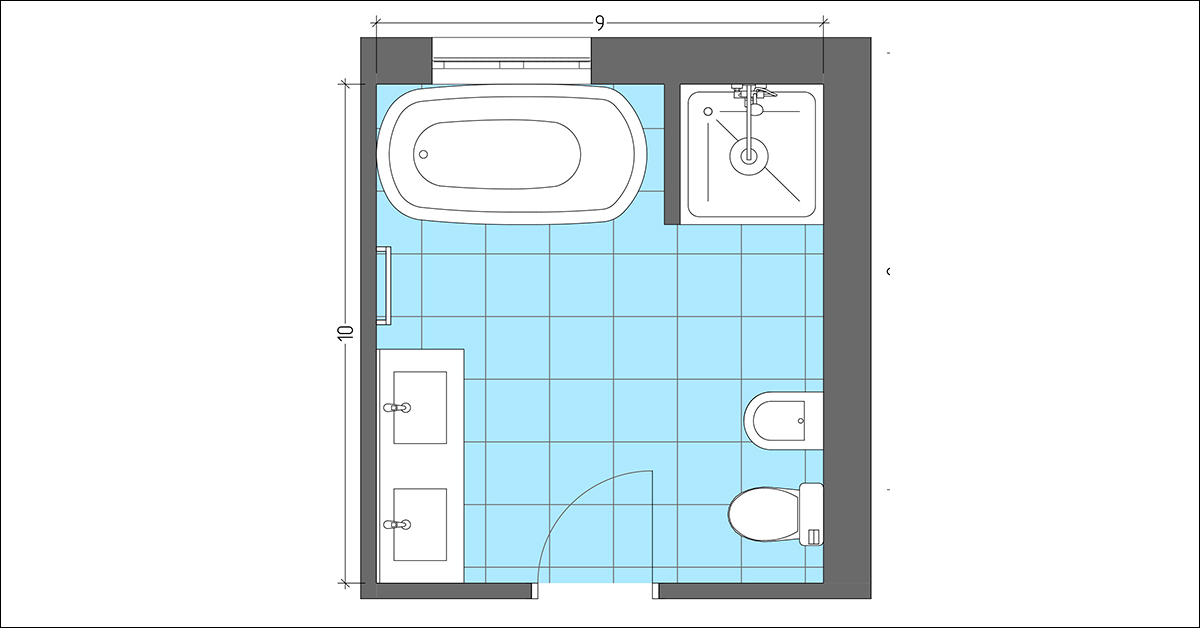
Consider another layout for the average master bathroom size, the main criteria for which are functionality and the maximum amount of free space. Since this room has a little less space than the previous versions, this influenced the relocation of the tub.
The tub is located in the far left corner of the bathroom to take up less space. This allows you to save more open space, but in this case, the bath is located in a niche with three walls, which significantly reduces access to it. In this case, it is recommended to use a built-in bath instead of a stand-alone tub, since you will have access to the bath from only one side.
A shower area is located through the partition from the bath. This keeps two-thirds of the bathroom space free. There are small sinks along the left wall of the door. Note that this layout does not use additional rooms.
To the right of the door is the toilet, installed without additional partitions. The openness of this site, even if it deprives you of an additional privacy zone, allows you not to obscure the place with walls. Also, if desired, next to the toilet, you can install a bidet, as shown in the drawing.
This example of a typical master bathroom size with dimensions of 10×9 is very spacious. The absence of additional furniture and minimal use of walls inside the room helps to achieve such results. A very practical layout option, with no privacy zones.
Typical Master Bathroom Size 9×11 with Open Layout
If you like to have everything close at hand, then you will surely love this master bathroom layout. The main concept of this layout is to arrange all furniture and plumbing along the walls, leaving a lot of free space in the center of the room.
Having created convenience in use, you will refuse additional walls dividing the room into zones. This may thus affect the lack of a privacy zone. Nevertheless, it is a very convenient option, especially for the simultaneous use of the master bathroom by one person.
The door opening direction can be performed both towards the bathroom and the bedroom. The second option will allow you to easily approach the sinks without even closing the door.
7×11 Custom Bathroom Layout for Young Parents
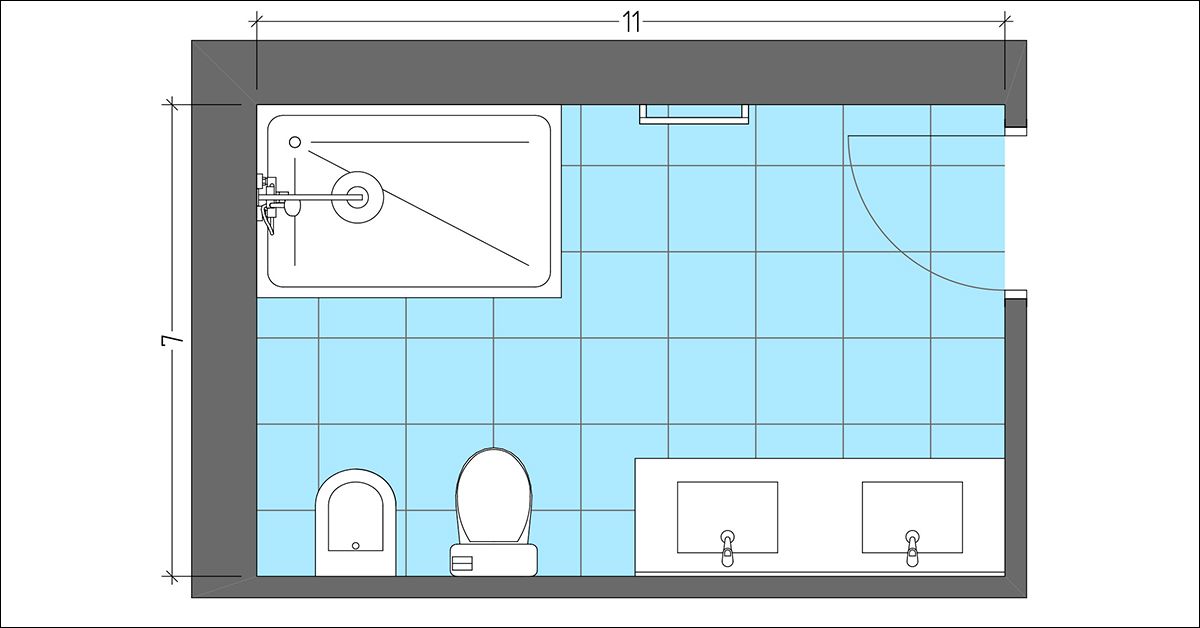
7×11 is not a typical master bathroom size. Its oblong shape may not be suitable for every home. In the shown drawing, you can notice a significant difference from the options provided above. The difference is that there is no tub in this case. To compensate for this change, a fairly large shower area has been installed.
The rest of the plumbing fixtures are installed along the left wall when viewed from the side of the door. Their location allows you to conveniently perform hygiene procedures, and a lot of free space in the center of the room allows two people to move freely around the master bathroom.
This layout was used in the home of a young family and one of the main priorities was the ability to install a special bathtub for bathing the child. If desired, the bath can be installed both in the shower area and in the free space in the center of the room. The owners of the house were very pleased with this creative approach of their designer.
If you also have unusual needs, then it is worth discussing them at the planning stage. Your designer will try to bring them to life and find the most suitable solution.
Extra Long 9×15 Master Bathroom
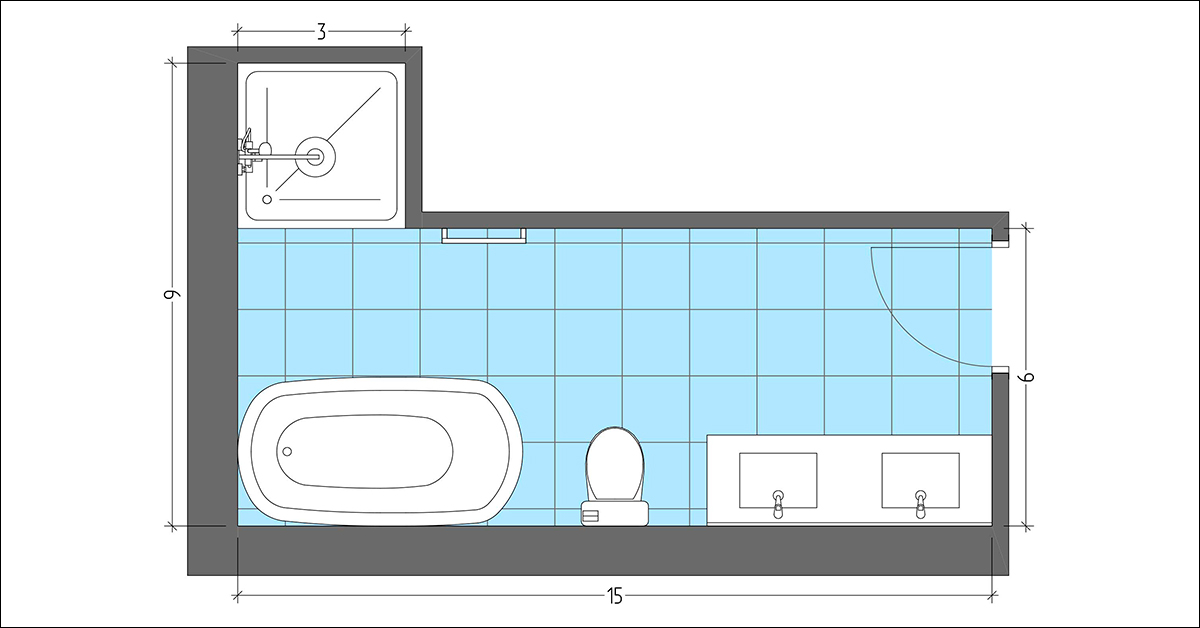
When planning rooms in a house, sometimes situations happen that it simply will not work to install a square master bathroom of the required dimensions. In this case, the architect can think of a non-standard master bathroom form. An example of such a layout is the above drawing.
The room is quite long, but narrow, which greatly affects the placement of the plumbing. Almost everything is located along one wall to save space for easy movement around the bathroom.
To choose what to place behind, in this case, it is recommended as the frequency of use. Because of this principle, the sinks are installed closest to the door. Behind them is the toilet, and behind it is the bath. The shower area is conveniently located in a niche opposite the bath.
With such a layout, with a limited width of the room, the main factor in arranging furniture should be convenience and the ability to move freely around the room. Let us remind you that this is not a standard option and it is better to coordinate such layouts with your designer. Having a clear idea of the location of the rooms in your home, he will be able to perfectly plan the placement of all plumbing.
9×10 Master Bathroom with Cutted Corner
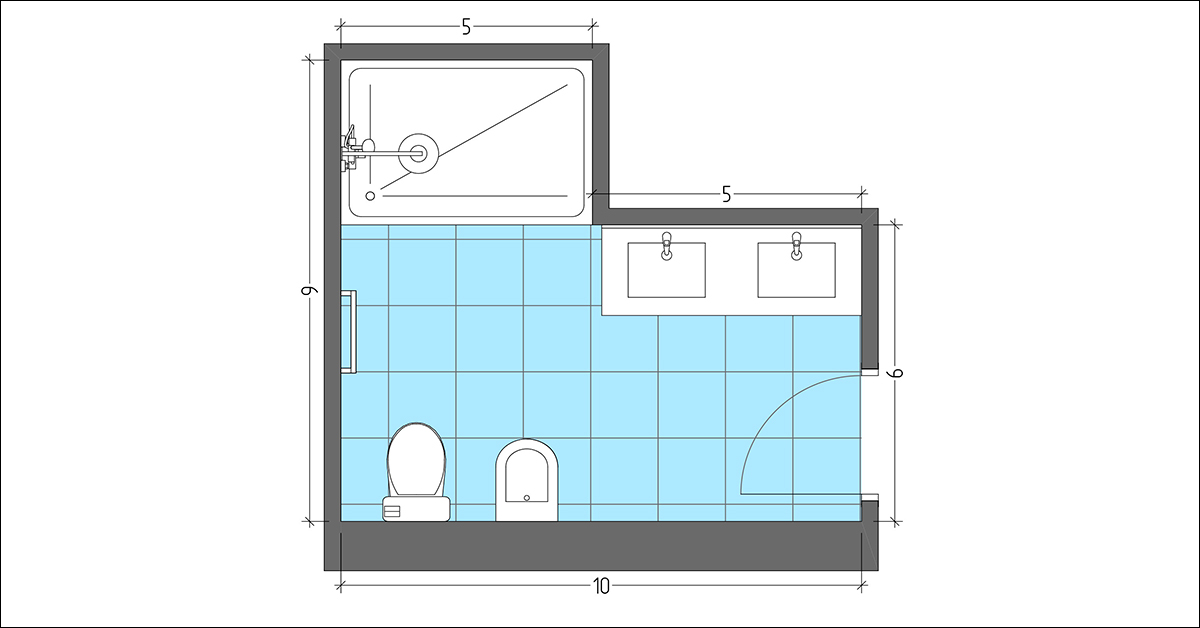
Let’s take a look at another example of a master bathroom layout that is found in houses with multiple floors. The reason that the room is not square was the staircase between the floors. Nevertheless, the room still has a lot of free space thanks to the correct placement of the plumbing.
Although the door to the master bathroom opens to the inside of the room, its location near the wall allows you to avoid creating a dead corner. The sinks are installed against a short wall right next to the door and are convenient to use without even closing the door.
A rather impressive shower area fits perfectly into the niche that remained on top of the drawing. And the toilet and bidet are installed in the far corner of the room, which allows you to have enough free space in all parts of the master bathroom.
This layout has an average master bathroom size and can fit most homes. The room is visually divided into three zones that have their purpose. This allows you to create convenience for daily hygiene without taking up a huge area of your home.
The General Conclusion for Master Bathroom Sizes and Layouts
Master bathroom sizes and layouts are completely different and their choice depends on many factors. First of all, these include the general layout of your home, as well as the plumbing and furniture elements you need. Plus, your preferences play a huge role. Some likes open space and easy accessibility, while others prefer to divide the typical master bathroom size into several parts with walls.
Since it is rather difficult to plan all the elements in the room correctly, Remodel on point recommends doing everything in several stages. First, you need to imagine what your master bathroom will look like. To do this, you can use the examples above or think of the placement yourself.
Next, it is worth discussing your desires with a designer or contractor who will carry out home renovations. With their vast experience, they will advise you on the most practical option based on your preferences. This is very important because the master bathroom is the place where you will spend a lot of time, everyone would like to feel the convenience and comfort.
latest video
news via inbox
Nulla turp dis cursus. Integer liberos euismod pretium faucibua