
7 Most Relevant 5×5 Powder Room Layout Plans for Home
When renovating a house, it is very important to decide on the layout of the furniture before starting construction. This is especially true for small rooms such as washrooms. Incorrect placement can lead to undesirable consequences. You may lose some free space and it will be inconvenient for you to use the washroom.
With the advice of professional designers, Remodel on point has compiled a list of 7most relevant 5×5 powder room layouts for your home.
- 5×5 Powder Room Layout with Fixtures on Side Wall
- The Most Efficient Powder Room Layout
- Washroom Layout with Extra Cabinet Space
- Powder Room with Toilet in Front of the Door
- Layout Plan with Toilet and Vanity on Opposite Wall
- Corner Powder Room Layout Plan
- Another Idea for Corner Powder Room
Let’s take a closer look at each of the examples given with their advantages in operation. This will allow you to find the location in the washroom that’s right for you.
5×5 Powder Room Layout with Fixtures on Side Wall
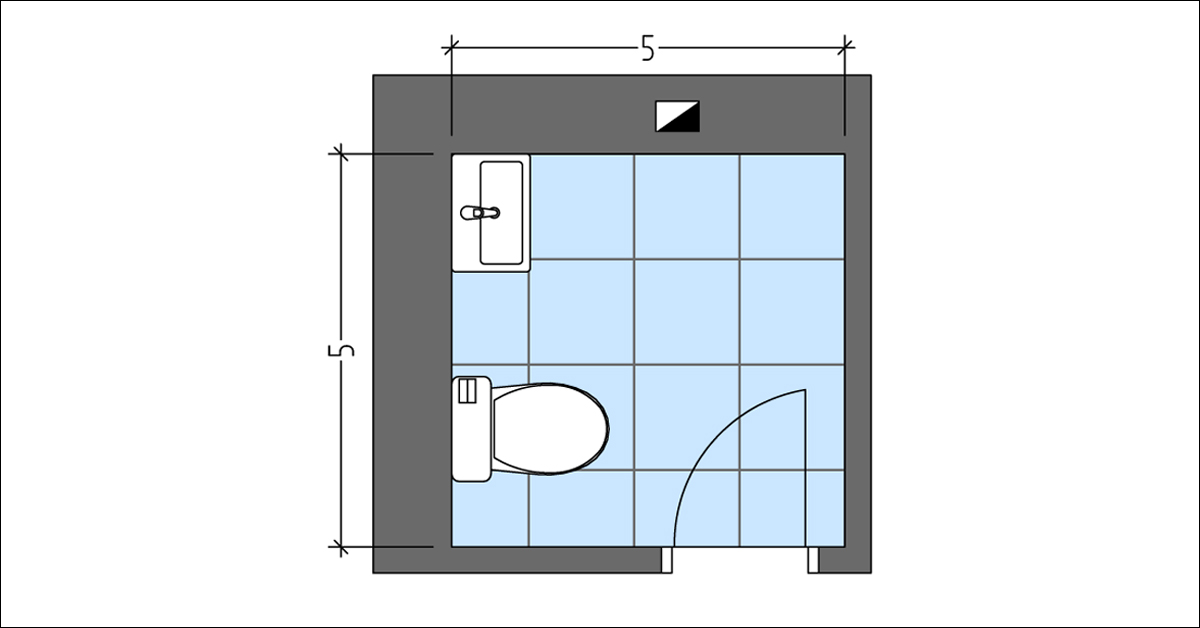
5×5 Powder room layout with fixtures on side wall.
This powder room layout plan is very common and can be found in most homes. It has simplicity due to the location of the toilet and sinks to the left of the front door. You will have enough space to calmly be able to walk to both the sink and the toilet.
Another major plus is that the door opens to the inside of the powder room. This is very convenient because you do not have to worry about how to arrange furniture in the room adjacent to the washroom. The location of the doorway is also important.
Firstly, if the doorway is positioned so that when the door is opened it is a short distance along the wall, this avoids dead space in the washroom. Secondly, if the doorway is placed to the left, it will be inconvenient to enter the room, since the passage will be right next to the toilet.
All in all, if you are looking for perfect simplicity in the arrangement of washroom parts, then this layout will certainly suit you. Plenty of free space, even in such a small room, will bring convenience to your guests.
The Most Efficient Powder Room Layout
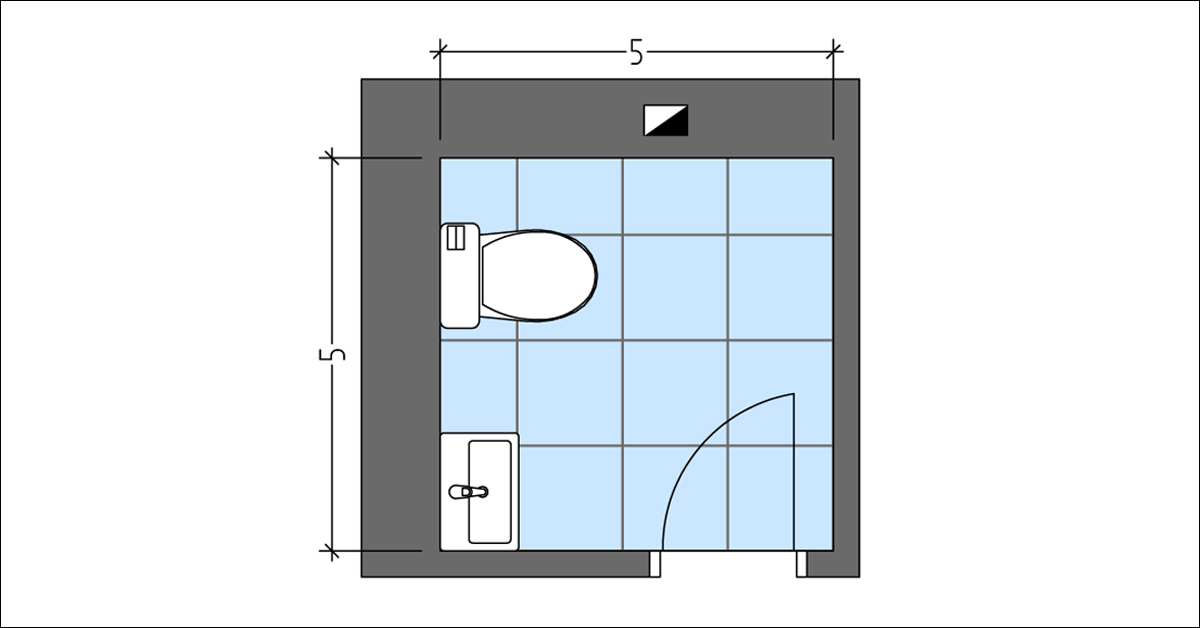
Recommended layout from Remodel On Point.
This type of washroom layout is not very different from the previous one. There is still a lot of free space and everything is near the left wall when viewed from the door. The only but very important difference in this washroom layout is that the washbasin and toilet are swapped.
At first glance, a small change is very important. Firstly, in terms of positioning, the sink takes up a little less space and when you enter the room you will feel like it is larger.
Secondly, the importance of the correct sequence of hygiene procedures. He washes his hands before and after using the toilet, which means that in this layout you will not need to walk across the room to first wash your hands and then back. Even if this is not so important in such a small room, more comfort would be better for everyone.
Washroom Layout with Extra Cabinet Space
Washroom layout with extra storage space.
This 5×5 powder room layout has a very unusual addition to this kind of room. This addition is the cabinet installed in the room along the right wall. It is designed to store essential items such as spare toilet paper, hand towels, detergents, and other small items. This is very convenient and will not embarrass the guest who has nothing to wipe their hands with.
Due to the built-in wardrobe, the size of the free space in the room has become much smaller, because the sink is located immediately to the left of the door and the toilet is opposite. It is worth considering such a layout carefully and not installing a sink that is too large so that it does not interfere with the passage into the room.
Also, because on both sides of the front door there are used washroom elements, the front door opens towards the corridor. You should think through everything to the smallest detail. This powder room layout plan is not recommended if it borders on a narrow corridor. An open door will completely block it, which will cause a lot of inconveniences.
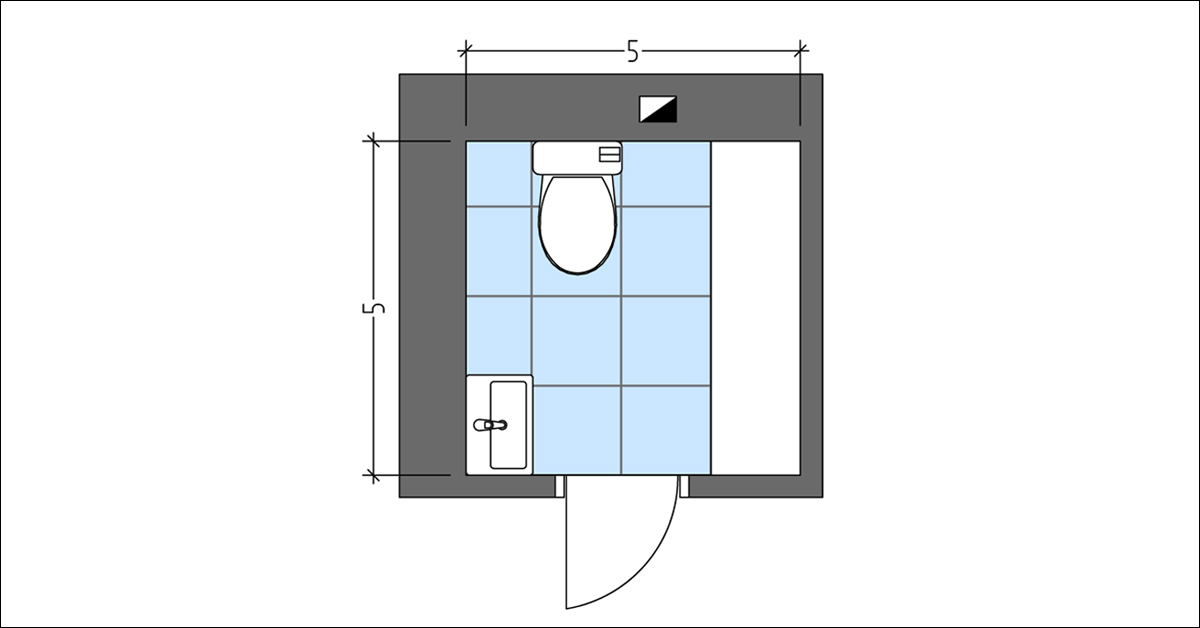
Powder Room with Toilet in Front of the Door
Convenient use of the entire space in the powder room.
Another example of a 5×5 powder room layout with a small cabinet inside. Unlike the previous one, this type of washroom is much more practical. The sink and toilet are positioned diagonally from each other, which creates a lot of free space to move around in the center of the room.
An installed cabinet for storing necessary things is in the far corner, which is very useful because if it were not for it, this part of the room would be dead space. And in this example, it performs the necessary functions.
The door opens to the inside of the room and you don’t have to worry about the outside space. As in the first example, due to the almost adjacent sidewall, the open door does not take up much space in the room. This example is very functional and makes the most of the entire washroom.
Layout Plan with Toilet and Vanity on Opposite Wall

Layout plan with toilet and vanity on opposite wall
If your priority when planning a 5×5 powder room layout is as much free space as possible, then this example is worth considering. The toilet and sink are located opposite the door, which is very convenient when entering a room. You will be able to freely use the washroom without being constrained in movement.
The door in this layout can be positioned both inward and outward opening. It will only depend on how comfortable it will be in your home. It is also worth noting that if the door opens inward, as in the presented drawing, then for convenience it is worth closing it immediately.
In this case, the location of the sink and toilet can be interchanged as you prefer. The main thing is to keep the distance to the door so that it does not rest against the toilet.
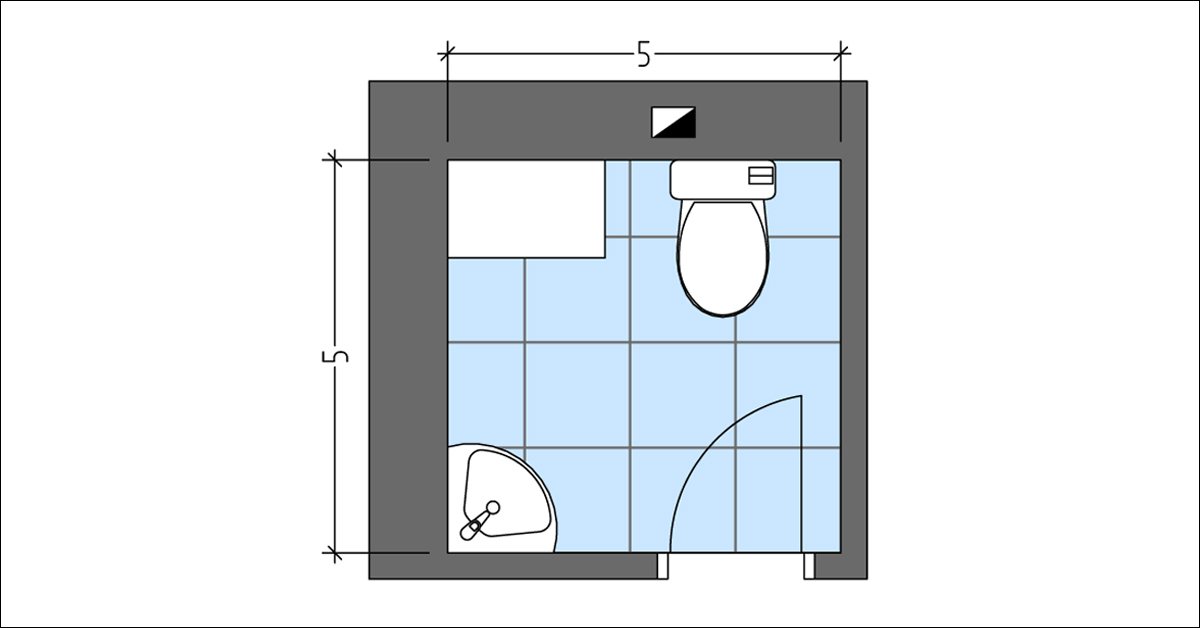
Corner Powder Room Layout Plan
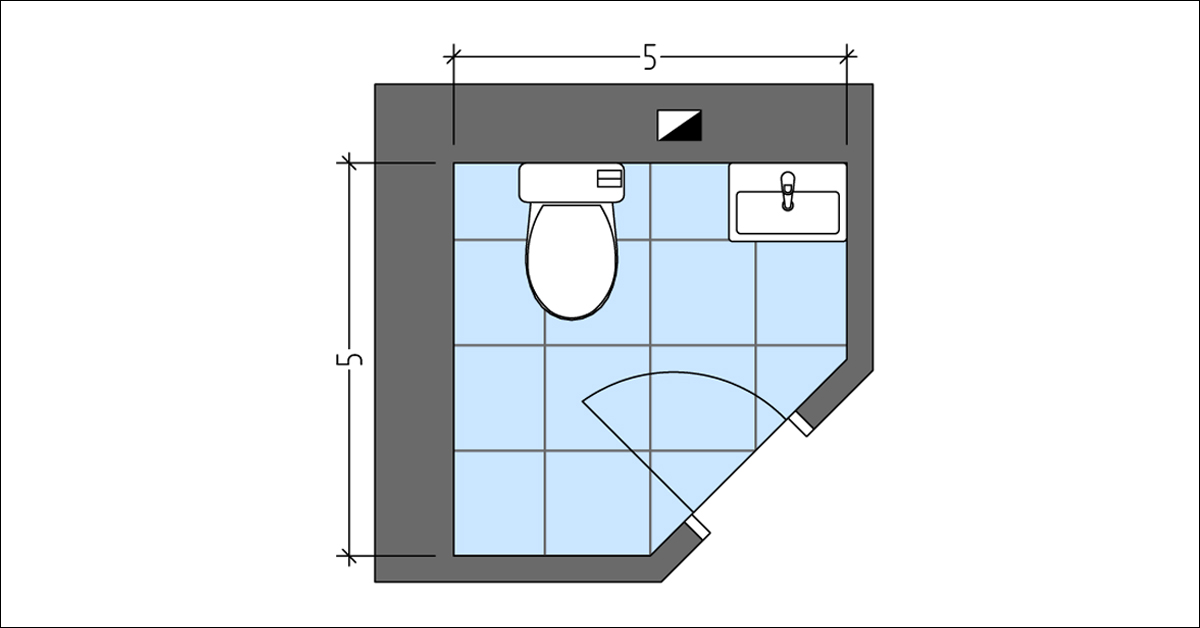
Corner powder room layout plan for home.
This type of layout, like the next, is a slight change in the planning of the walls, but still, they can be attributed to 5×5 powder room layouts. The main feature is the beveled wall in which the doorway is located.
This change is perfect for homes where the washroom is in contact with a very narrow corridor. This change in the position of one of the walls will allow more space for the corridor, which will make it more comfortable to move.
In this image, the entrance door is directed towards opening into the room. This maximizes the free space outside the room. The sink is located immediately to the right at the entrance to the room. This is very convenient because you can wash your hands right away, even if you don’t plan to use the toilet. The location of the toilet bowl was not chosen by chance. With the door closed, you will have ample space and not feel like you are close to a wall.
Another Idea for Corner Powder Room
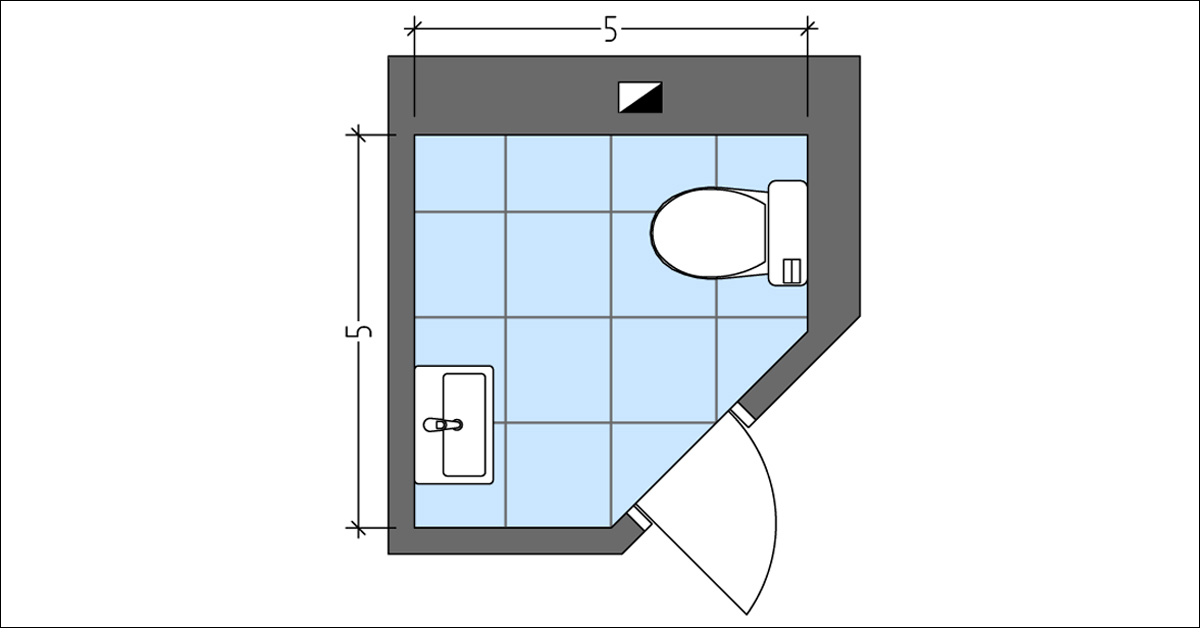
The idea for a corner powder room on the first floor.
This example is very similar to the previous one, with some important differences. The main difference is the opening of the doors towards the corridor. It is worth carefully considering the possibility of such a powder room layout plan.
Because the door opens outward, a sloped wall will not do much to increase the free space in the hallway when using the washroom. However, this is a fairly convenient option.
By opening the door, you immediately have free access to everything that is located in the room. It is very practical and allows you to experience comfort even in such a small room.
Conclusion about 5×5 Powder Room Layout Plans
Each of the listed examples has its characteristics. You can choose an option with a large amount of free space and with additional storage space for various things.
These layouts aim to make the most of the available space in a small room like the 5×5 powder room. Convenience and comfort when using the room is also an important factor.
Having chosen the option that you like best, we recommend that you discuss it with your contractor or a professional designer. They will be able to assess the overall possibility of placing such a layout in your home.
latest video
news via inbox
Nulla turp dis cursus. Integer liberos euismod pretium faucibua