10 French Drain Mistakes to Avoid – Remodel On Point
French drain is a creative solution to divert water away from the house and keep it protected. Unfortunately flooding still happens too often these days and very costly to fix.
The idea is to dig a trench with weeping tile and direct water down the slope. Sadly contractors charge a lot of money for this work. It seems simple to make a french drain but mistakes can cause the opposite effect from what you are looking to do and flood the whole house.
To avoid costly mistakes and have to redo entire project we decided to list 10 common french drain mistakes. It could help home owners properly do DIY job without spending extra money and remind contractors what to be careful with.
Here are 10 french drain mistakes to avoid:
- Forgetting to Do Locates
- Incorrect Slope
- Missing Drain Fabric
- Not Putting Weeping Tile
- Whipping Tile Not Connected
- Wrong Material/Rock Backfilled
- Overloading French Darin
- Regulations and Bylaws
- Exit Point for the Water
- Avoiding to Deal with Roots
Even contractors that perform similar work every day and specialize in french drain installations; we suggest creating to do list for all. Outlining common mistakes will help prevent issues in completion and warranty jobs.
[instagram-feed]Forgetting to Do Locates
This one is really important to complete before starting to dig. We understand that trench is never deeper than 4 feet and should not cross service lines, but staying safe is the first rule of construction projects.
Call 811 – It’s easy to remember but also easy to forget making that call. Larger companies implement creative strategies for reminding every crew to get locates before any excavation is made. The first french drain mistake can be avoided by putting a sign on truck, morning safety talk and mandatory safety training for workers.
We understand that drain companies almost never get large enough to have separate budget for health and safety department. For the sake of protecting all workers and company from fines for damaging service lines (gas, water, electrical wires) make it mandatory to check every morning.
Avoid Fines – Companies responsible for damaging city lines are fined from few hundred up to several thousand dollars.
Health Hazards – The most dangerous service line to accidentally break is electrical. Many people get major electrocutions and die every year from hitting underground power line.
Incorrect Slope is Among French Drain Mistakes
Once again let’s start from beginning. French drain purpose is to direct water away from house without implementation of any motor or pump.
Therefore water has to be absorbed and trench mechanisms go down the hill. Another way of saying it is: create continuous and positive slope of 2 – 4 percent.
Simply digging out a trench and collecting water inside can cause immediate flooding and long term structural problems for the house. If water does not go away it certainly affects foundation wall.
Engineers and licensed suggest minimum 1 percent for French drain slope but our recommendation is slightly above that. This is due to sand with dirt accumulating inside pipe walls and higher slope makes it easier to push it through.
To make it easier – install weeping tile two to four inches lower every 10 feet. Some projects have limited height and complicated elevations to work with. There we suggest going at least 1 percent slope, but increase it if possible.
Missing Drain Fabric
Next item on our list of mistakes for installing french drain is missing fabric that protects pipe from filling in with soil and other debris.
Accumulation of dirt and small rocks can cause complete blockage of weeping tile and water will go backwards towards the house. This is worse than having no french drain at all. Damages can be caused to home structure, trees, roots and landscape.
There are two ways to make sure this tragedy does not occur and within a year of time the owner would call back for redoing french drain completely under warranty.
Buy Weeping Tile With Fabric – this is a simple one. Never purchase weeper without fabric on it.
Inspect Fabric Before Installation – pull it very hard from both end of pipe and inspect for damages. Fabric can have been laying in storage for months and even years. This can significantly lower sturdiness.
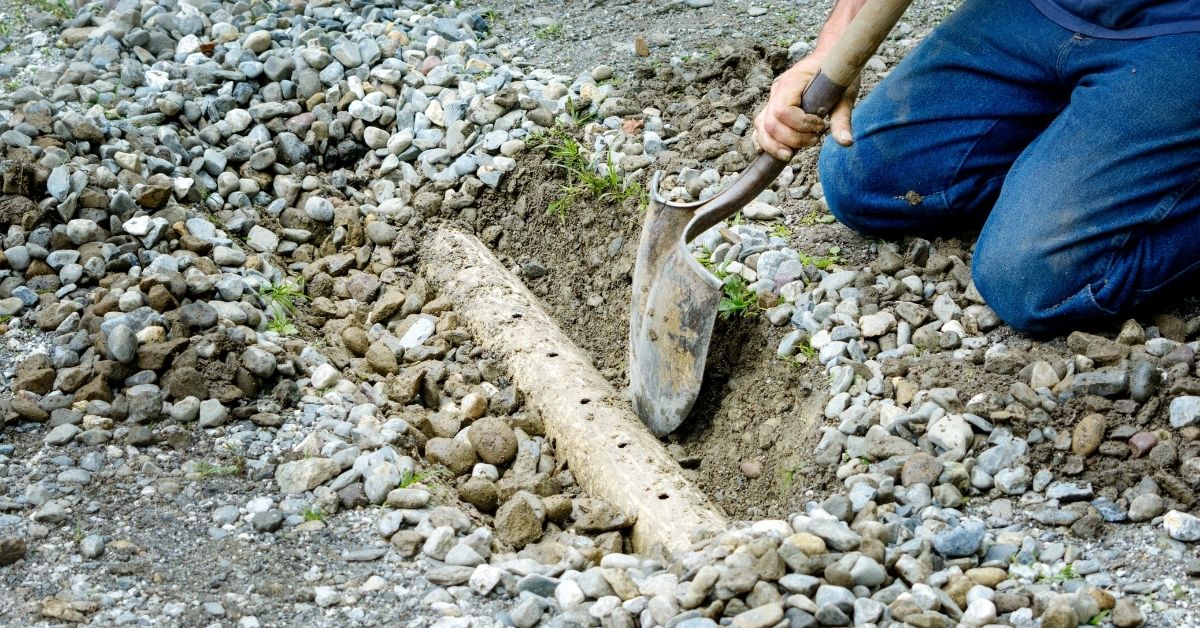
Not Putting Weeping Tile
Finished trench without weeping tile does not serve any purpose. We have been amazed several times when home owners reported to us (with images) french drain finished without weeping tile at all.
This mistake is very hard to comment. It can be compared to car without wheels or house without roof. This insanity should not be ever performed and weeper is the main vehicle of french drain technique.
Apparently some contractors thought that putting clear gravel was enough for water to go freely underground. The only problem with that, it mixes with soil and becomes as solid as other dirt.
Some have experimented with putting real plastic pipe with holes in it – Still terrible idea. It does not freely absorb water and holes get plugged by gravel. In other words its useless and nothing but weeping tile will work.
Whipping Tile Not Connected
In large projects there could be several trenches connected together. It is too a french drain but much larger that single trench system. On downhill weeping tile can be connected to another row that collects water from retaining wall or stone stairs.
French drain mistake that is simple to make but hard to fix is not connecting or properly securing weeping tile pipes together.
This can lead to overflow at point of connection. Break in connection can lead to blockage in one weeper and complete leakage from other, without getting to final destination where water is exited.
Such a large accumulation of water can cause underground streams that wash out large portions of soil. Further collapse of walls and parts of landscape are possible.
To make sure this does not happen, proper connectors are used. They simply click in together with weeping tile and stay connected. Fabric from pipe has to be pulled over connector to cover wholes.
Wrong Material/Rock Backfilled
Empty trench can have all types of soil and the idea is not to mix it with our gravel. At first, contractors need to put down material that is popular in landscape industry.
It is used for purpose of bottom layer of soil not mixing with clear gravel. Another reason for fabric is to make sure small plants do not grow into our french drain system and have roots everywhere.
Proper installation of french drain includes putting gravel at the bottom of trench and on top of it before backfilled with soil. We have repeated this already many times but here it goes again – clear gravel stops soil on top and lets unwanted water go through towards the exit point.
Suggested Material – 1 ½ inch clear gravel stone
On top of everything top soil is preferred for natural growth of grass. Sometimes french drain does not go too deep and we seep gravel stone on surface. Do NOT compact soil on top of trench – just let it be.
Overloading French Darin
Don’t get carried away thinking that simple trench with weeper and gravel can take care of all the water in the world. Simple french drain system is meant to collect rain water from small hills and slopes towards the house with purpose of directing it elsewhere.
Another mistake on our list is overloading the system with other water discharges. Most common water sources that we see are connected to french drain are:
- Sump Pump Discharge
- Downspouts from Roof
- Sloped Driveways and Landscapes
- Any other drain system
Remodel On Point suggests separating each system and spreading the water across the land. In worst case scenario the trench will not handle amount of water and it stream backwards.
Regulations and Bylaws
If you are not convinced that french drain has to be installed for necessary protection of your or adjacent properties, local authorities can definitely help with that decision.
Bylaw officer or city inspector can obligate home owner to comply with order. It is a written order to comply with local laws and regulations within specific time. When home owners or builders ignore such order, they can write tickets for several hundred dollars.
Multiple offences can end up in court or job shot down for builders. Here is when french drain mistake can lead to municipal order:
Flooding Neighbor – Neighbor can complain to city for improper grading. All the water from your property has to be controlled.
On Initial Drawing – Original grading plan for new home construction can indicate french drain location.
Endangering City Property – When old water discharge systems fail and due to heavy rains you flood city side.
Exit Point for the Water
All the water has to end up somewhere without causing additional problems. As it goes through french drain and natural terrain the exit point has to be sufficient for safe discharge.
It means that accumulation of water from all drain pipes and natural sloped landscape has to end up in place where it does not cause overflow with potential damages to structures or roads.
Most common exit points for french drains are:
Pump Pit – Excavated massive pit that filled with crushed stone
Catch Basin – City installed storm drain that can store/redirect water
Unoccupied Ravine – Natural land where wildlife won’t be bothered
Surveyors or geo engineers can help design proper exit point for planned size of french drain. Always get opinion of professionals to make sure you won’t have to redo it again.
Avoiding to Deal with Roots
Number one cause of drain failures, blockages and collapses is roots from nearby plants or trees. French drains have the same problem and avoiding it is a big mistake.
Whatever is done in landscape business, we always try to make sure roots don’t ruin the work. French drains have water that runs through and attracts all types of plants that expand their roots.
To fix this issue it is recommended to put proper linen material at the bottom of the trench, add several inches of grave and inspect weeping tile for cover material that protects it from blockage.
latest video
news via inbox
Nulla turp dis cursus. Integer liberos euismod pretium faucibua