Average Swimming Pool

Average Swimming Pool Depth Recommendations and Rules

Last Updated: 2021-08-30By

When it comes to building a backyard pool, depth is an important factor. There is a lot of controversy about the average pool depth and in certain cases, each of the options will be true and it is very easy to explain.

There is no average pool depth to suit all pools. Swimming pool depth recommendations are based on its use. For children, a depth of 2 – 3 feet is required, if you prefer to swim 4 – 5 feet will suffice, and the minimum pool depth for a diving board is 10 feet or more.

Therefore, to determine what depth of the pool will be optimal, it is worthwhile to clearly define the scope of what it can be used for. It is not necessary to limit yourself to choosing only one option. You can create a pool suitable for children and divers alike.

[instagram-feed]

Average Pool Depth in Different Pools

Based on such a variety, it is worth immediately determining what you would prefer to use your pool for. We suggest that you consider in detail all the popular pool options so that you have a detailed idea.

1. Children’s Pool Area

If you are planning a pool for children, the average pool depth will be 2-3 feet. This optimum depth will make children feel comfortable and safe in the water. Also, a pool of this depth is perfect for those who just like to lie down in the water.

If you have small children, you can also take care of creating separate niches around the main pool. Typically, these niches are 3-5 inches deep and are great for the smallest family members. This will allow them to be at a safe depth while being fenced off from the main pool.

2. Swimming Pool Depth Recommendations

One of the most common pool options is a swimming pool. The swimming pool depth recommendations are then 4 feet. This is the optimum depth at which you will not bump your feet on the bottom of the pool while swimming.

Plus, this depth allows you to safely finish your swim and get back on your feet anywhere in the pool. This can be very practical if you are very tired or have a cramp while swimming.

It should also be understood that for a comfortable swim, the pool must be made quite long. The recommended pool length, in this case, is 25 feet.

3. Minimum Pool Depth for a Diving Board

What could be better than on a hot summer day with a running jump into a cool pool? Undoubtedly, this can be enjoyed by both adults and children. But it is worthwhile to understand that due to the jump, the human body displaces a larger volume of water, which means that the depth of the pool should be greater.

The minimum pool depth for the diving board counts at 10 feet. This depth is enough to safely dive into the pool, even upside down, without fear of hitting the bottom. It is also worth remembering that 10 feet are the minimum depth for a diving pool. If you install a high springboard, then the depth of the pool will have to be increased accordingly.

If you love jumping from a high springboard and are seriously thinking about installing it at home, then you should turn to professionals for designing your pool. A swimming pool construction company will advise you on how best to bring your idea to life and what safety measures should be taken. This will apply to both the depth of the pool and other important factors.

Pool Designs with Different Depths

Swimming pool with levels

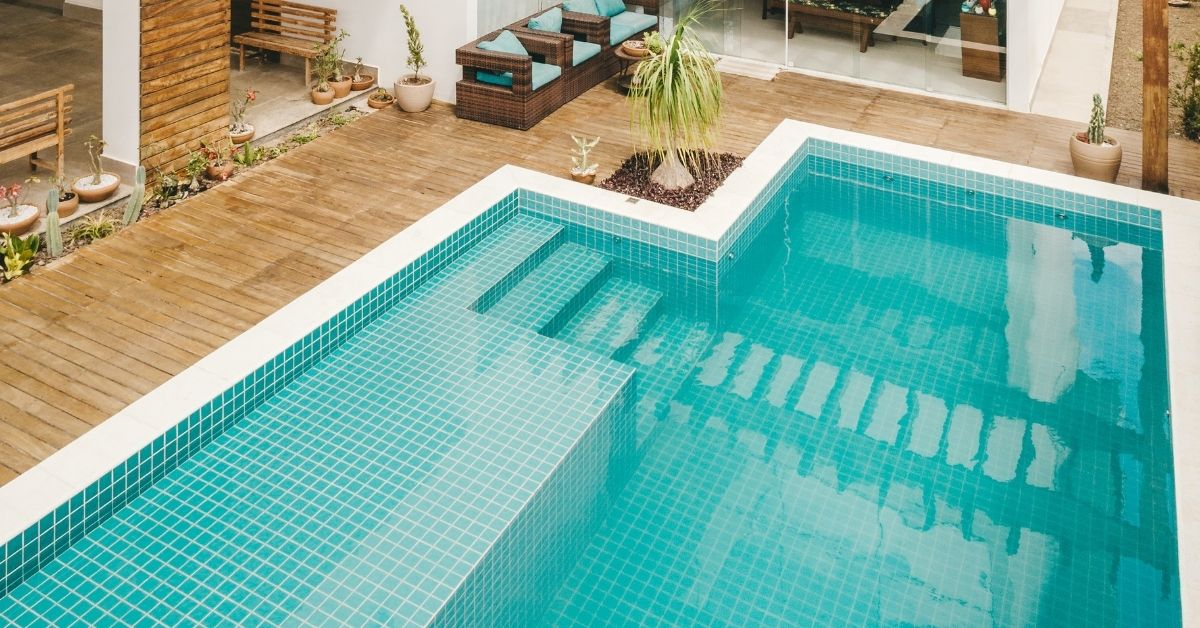
Swimming pool with different depth levels.

We have already decided that the average pool depth depends on what you will use it for. But as everyone understands perfectly well, in reality, you want the pool to be very functional and fit the desires of all family members. Therefore, at the planning stage of the pool, the architects calculate all the factors.

The most common option is pooling with varying depths. For example, this could be a swimming pool with a minimum swimming pool depth recommendation of 4 feet on one side and 10 feet on the other for setting up a diving board. But it should be understood that such a pool should be long enough since the recommended slope of the pool depth is 3 – 6%.

This will allow the pool to be used for both swimming and diving. In addition, for ease of sailing, on the deeper side, you can install a small ledge at a depth of 4 feet. This site will not interfere with jumping but will be useful when swimming if you want to take a break in the deeper part of the pool.

A children’s area can also be added to this pool. It is recommended that it is bordered by the shallower side. It is also worth taking care of the restrictive bumpers so that children cannot get into the deep part of the pool.

Another variation of a pool with varying depths can be a stepped pool. Unlike the first option, such a pool has sharp drops in depth. They consist of different levels and the average pool depth can vary from case to case. Such pools often have an unusual rounded shape, which looks very aesthetically pleasing.

How Pool Depth Affects Cost and Maintenance

When calculating the depth of the future pool, it is also worth noting that it will significantly affect the cost of construction and maintenance. First, a deeper pool is more difficult to build. Secondly, more water is required to fill and clean it. The same applies to heating the water in the pool, the larger the volume, the more electricity is consumed.

Therefore, when planning the construction of a new pool, it is worth making sure that its maintenance matches your budget. For example, adding a couple of extra feet of depth can cost you up to $ 1000 per year in maintenance.

Planning and Swimming Pool Depth Recommendations from Professionals

Pool installation professionals recommend a clear sequential action plan to determine which pool is right for the client. Let’s take a quick look at the main points from this plan to determine the average pool depth that is compatible with everyone’s needs.

The first thing to consider is the client’s preferences and what he will use the pool for. This information will help determine the required average pool depth for each part of the pool.

Another important factor is the size of the pool area. If you have a large backyard that will be used as a pool, then you can install a pool with a smooth change in depth. If the territory is limited or there is a personal desire of the client, then they think over the shape of the pool with a stepwise change in depth.

After planning these stages, all that remains is to build the pool and put it into operation. Remember that the construction of a pool is usually thought over for five or more years. In this case, if you are thinking over an area for small children, they will grow out of it very quickly, and perhaps you should think about how to use this part of the pool.

editor's pick

latest video

news via inbox

Nulla turp dis cursus. Integer liberos  euismod pretium faucibua

Each building has some sort of driveway or at least should have. The main reason is for vehicles to come closer without need to walk all the way. Some homes are residential with small driveway for their car to come in and park before garage or front entrance, and others can be large commercial buildings with loading docks, delivery entrances and casual parking entrances. On Point Remodeling was asked for suggestions on residential driveway for new home construction, and we decided to write detailed article for all our readers. Using this guide you can select the material for your driveway and see what works for your budget. Here are the materials for driveway we will be discussing in our guide:
  • Asphalt
  • Concrete
  • Paver Stone
  • Crushed stone
  • Brick
  • Seashell
  • Gravel
To find good contractor for your driveway, you can either ask our team by email or try to find someone local that worked with neighbors or nearby buildings.

Installation process of any material surface on your driveway

a) Demolition and Excavation – Before anything is done, your contractor will get heavy machinery and scratch off old layer of driveway. They need to go down at least 5-6 inches to insure proper layering before your final layer of material is installed. b) Material Purchase and Delivery – At this point your contract is signed and you already know how the surface will look. Contracting company purchases necessary materials and delivers them to site. Double check if material is correct and not damaged. c) Preparation of Sublevel – Whatever you place as final material, it cannot just be installed directly on top soil. Gravel is the first choice of material that goes down at this stage. Other preferred material is screen sand that can go on top of gravel and works better with stone and bricks. d) Compaction of Ground – To prevent your driveway from moving and changing shapes, all the layers from bottom up have to be properly compacted. Do not leave any spot untouched while doing this or you can get small holes and cracks in driveway after installation. E) Final Installation – This is when all the magic happens. After all preparations and dirty work the final installation is made literally within hours and you can enjoy new driveway. Stone and brick is set up by hand, while other materials require some sort of machinery with manual labor to even out surface.

1. Asphalt

Probably the most used material for road top surfaces as well as driveways is asphalt. This is a mix of gravel and sand that is mixed in and combined by asphalt cement with crude oil. Pros of Asphalt Driveway
  • Very popular and easy to find materials/contractor
  • Completed in 1 day and you can drive on it after
  • Patches and small holes can be fixed fast
Cons of Asphalt Driveway
  • Easy to damage and cracks appear in few years
  • Almost everyone else has same surface
  • Oily surface and chemicals used in mix
Prepared for asphalt driveway will cost you around $5 per square foot to finish. The contractors that take care of entire process from taking out old driveway surface, install subsurface and compact the ground with new asphalt on top, will charge on average $5500 per regular size driveway at single home property.

2. Concrete

What we call concrete is a mixture of Portland cement, aggregate as well as sand with gravel. Suggested thickness of concrete for driveway is 6 inches. The mixture needs to cure without being touched or driven on top for several days. Pros of Concrete Driveway
  • Durable material for large weights
  • Long lifespan if installed properly
  • Winter and summer friendly
Cons of Concrete Driveway
  • Has marks and stains over time
  • Hard to repair without replacement
  • Super hard to DIY
To hire contractors for concrete driveway it will cost around $7-$9 per square foot. This will include site preparation with gravel spread and new concrete installation. They will order full truck of concrete (or several for larger driveways) to pour inside forming. Smoothening and curing is required after installation.

3. Paver Stone

The most luxurious material that you can use to create driveway path with is paver stone. It is made out of natural stone with uneven rough shapes that have different line patterns. Paver stones are very heavy and are perfect for weights on top of them. Almost every city in Europe has roads and walks made out of stone that were installed centuries ago. Pros of Paver Stone Driveway
  • Creative designs can be done
  • Personal looks, can match the house
  • Can replace single stone in minutes
Cons of Paver Stone Driveway
  • Weeds growing through
  • Stone can move over time
  • Most expensive material
There is wide selection of stone that can be purchased for your driveway. On average we recommend settling with $17-$20 per square foot for stone with installation included. Working with this material is very intense labor and we recommend hiring professionals that do this type of work every day.

4. Crushed Stone

Our readers sometimes mistake crushed stone with gravel, but this is not the same material. Crushed stone material is achieved when machine is mechanically crushing larger pieces of unused stone for this specific purpose. It is larger than gravel and can have smooth finish. Crushed stone can also have a mix of colors, which is much pleasant to eyes than gravel. Pros of Crushed Stone Driveway
  • Low maintenance required
  • Fits rural area style
  • Can be reused for other purposes
Cons of Crushed Stone Driveway
  • Gets very hot during summer
  • Can be messy after many drives
  • Hard to remove snow and ice
Buying crushed stone and installing it on your driveway is as easy as it gets. Similar to other rough materials discussed in this post, only small tools like shovels, dolly and buckets are required to spread it on the road. The cost of crushed stone driveway is between $4 and $6 per square foot from professional local contractors that can finish the job in several days.

5. Brick

The same brick we see being used in wall construction can be installed as top driveway surface. Brick is manufactured by compressing clay with plastic mass. It is heated to extreme temperature and dried up to become as solid as you know it. Pros of Brick Driveway
  • Variety of selections in shapes and shades
  • Bricks are recyclable
  • Slip resistant with rough top part
Cons of Brick Driveway
  • Needs regular maintenance
  • Change color over time
  • Old fashion looking
Installing brick on driveway costs $10 per square foot, which is not too far from masonry brick laying as part of the wall. To save money you can use or purchase old brick, that was part of a wall before. Do not mix these two jobs and contact landscaping professionals instead of masonry contractors that work with bricks.

6. Seashell

This material is popular on the coast line where shells can be found near the water. Construction companies use seashells to add in other materials as well as spread them on driveway in rough condition, without adding anything else. It usually comes in white or pearl color and darkens within year because of mixing with sand and dirt. Pros of Seashell Driveway
  • Environmentally friendly
  • Has natural drainage
  • Creates worm vibe of beach house
Cons of Seashell Driveway
  • Break and crack under light weight
  • Sharp and very hard to walk on
  • Gets stuck in shoes and tires
To deliver and spread seashells on driveways costs below $4, which is only slightly more expensive than rough gravel. As you go further from coast line, cost of material increases due to delivery. This material is elegant and very soft. We recommend adding edge lines with darker color landscape material to create visual path.

7. Gravel

This material is used in other construction mixes and underlayment systems. It’s literally fragments and small crushed stones that are put on top of soil. It is easily spread out by hands and anyone can do it. Pros of Gravel Driveway
  • Cheapest of them all
  • Easy DIY Job
  • Can install another material on top
Cons of Gravel Driveway
  • Needs to be graded very often
  • Will mix with dirt and leaves
  • Washes up with heavy rains
It is rough material and can be purchased in bulk (by metric tons or cubic meters). The cost of driveway with gravel should not exceed $3 per square foot, but you can save tons of money by purchasing materials and doings installation by yourself. You do not require specific tools or heavy equipment for the job and delivery of gravel can be arranged directly to your project.

Conclusion

To properly finish any and all of these driveways requires skills and experience. There is no way you can complete any of these projects without heavy equipment and tools that regular home owner’s just store in their garages. Most of those who will read this post will prefer to install asphalt driveway, because of its popularity and low costs. We want to encourage home owners to go for personal preference and what matches your house, rather than getting the most affordable and popular items. Driveway jobs have to be completed fast; otherwise you will need to park elsewhere while the project is running. To not overpay, ask us for quotation sample on material you prefer in specific region where the work need to be done and our team can provide some numbers.

Leave A Comment