
How to Figure out Average Kitchen Countertop Square Footage
Contemporary luxury countertops are the hallmark of every kitchen. Unfortunately, because we are often cooked on them, the appearance of countertops can change significantly several years after installation. Therefore, their replacement can occur even without a complete renovation in the kitchen. And if you call a countertops replacement professional, the first thing he asks you is the size of the surfaces to replace.
How to figure out countertop square footage? You need a measuring device and basic knowledge of mathematics. To find out the kitchen countertop square footage, you just need to measure the length and width of the countertop and multiply them. The same process should be applied to the kitchen island and backsplash.
But it should be understood that there are some features for each kitchen. Therefore, below we will consider in more detail all the features associated with calculating the sizes of countertops.
How to Calculate Square Feet of Countertop in Different Kitchen Layouts
As mentioned earlier, the size of the kitchen and the number of cabinets are directly related to the size of the countertops. The main thing in the number of work surfaces is that there are enough of them for comfortable cooking. Therefore, when the question arises of how to figure out countertop square footage, the best solution would be to consider it with a few examples.
Kitchen Triangle
We’ve all heard of the kitchen triangle as the most convenient way to position appliances in the kitchen. If this name is new to you, then it means that the stove, sink, and refrigerator should form a triangle for convenience in the cooking process.
Work surfaces in this layout are often located on both sides of the stove. The optimum size for these surfaces is 23-30 inches in length. Such a surface will be sufficient for cutting food or placing small equipment.
This kitchen layout uses a kitchen island on which the sink is located. The remaining surface of the kitchen island will also be the countertop. Therefore, the average kitchen countertop square footage will directly depend on the size of the island.
One-wall Kitchen Layout
If you are not a fan of cooking and do not intend to spend a lot of time in the kitchen, installing a one-wall cabinets layout is a good solution for you. This kitchen involves the installation of all elements of the kitchen along one wall. It is very easy to calculate square feet of countertop in this layout, it will cover the surface of all cabinets. Therefore, to calculate the countertop square footage, it will be enough for you to know the length of the cabinets along the wall.
Figure out countertop square footage in one wall kitchen.
109 * 24 = 2616 (18.2 sq. ft.)
To calculate the length of the required material for a given countertop, add the length of all cabinets and stove. Also, since the left side of the kitchen is not adjacent to the wall, there will be a 1-inch overhang. After doing all the calculations, the total length will be 109 inches.
Countertop depth is standard and with overhangs is 24 inches. As a result, to get the dimensions of the required countertop in square footage, you need to multiply the length by the depth. As a result, for such a kitchen, the countertop size will be 18.2 square feet.
L & G Shaped Kitchen Layouts
For L & G shaped kitchen layouts, the answer to the question of how to calculate square feet of countertop will be a little more difficult, but the main thing is to know two basic rules. You need to calculate the length of the surfaces near each wall.
Another important detail in calculating the square footage of a countertop is how the two surfaces meet at the corners. There are two ways to connect 45° and 90° countertop stone slabs.
The 90° connection is the simpler and cheaper option. In this case, you do not have to cut off part of the plates to combine them. One of the surfaces is laid from wall to wall, and the second simply leans against it tightly and goes along the second wall. Because of this, you use all the purchased material, which reduces your costs. Unfortunately, this method of stacking countertops is considered less elegant.
If you are striving for maximum beauty, then we recommend using joints at an angle of 45°. For this to be possible, part of the material is cut off from both plates at the junction and it looks like a diagonal line directed to the corner of the room. To figure out the countertop square footage, it is worth counting the size of the whole slabs, since the cut pieces will simply go to the trash and will not be used.
Calculation of countertop square footage for L-shaped layout.
Cabinets countertop and waterfall
(24+96+40+36) * 24 = 4704 (32.7 sq. ft.)
For simplicity, we will divide the measurements into three parts. First, measure the area of the cabinet that stands to the left of the stove, since this part of the countertop stands alone and is 24 inches long.
Next, we will measure the cabinets located along the same wall. Since there is a sink in the corner, in this case, the connection between the sides is made at 90 ° and you do not have to spend more material. By doing some calculations, we get a length of 96 inches.
The last thing left is to calculate the size of the side cabinet. If you look at the photo you will see that the sidewall of this cabinet is made of the same material as the countertop, the so-called waterfall. Therefore, it is also necessary to consider this size and the total length of the material required for this cabinet is 76 inches.
To obtain the total area of the entire surface, as in the first example, we need to multiply the resulting figures by a depth of 24 inches. As a result, the countertop in this kitchen will be 32.7 square footage.
Don’t Forget about the Overhang
Often wondering how to calculate square feet of countertop, people think that the size will be the same as that of the cabinets, but this is not the case. This is a misconception. This is because many people forget about the presence of overhangs.
Overhangs are small countertop ledges made for the convenience of using the kitchen. They are often sized 1-2 inches. It is not recommended to do overhangs of large sizes, as this can cause inconvenience during cooking, moreover, it can disrupt the aesthetic appearance of your kitchen interior. Because of this, when the standard depth of your cabinets is 23 inches, the depth of the countertops is 24-25 inches.
In appearance, this is not a big difference, but it is worthwhile to understand that each detail must be correctly calculated because this affects the amount of material required.
How to Figure out Countertop Square Footage for Kitchen Island
A kitchen island can be one of the trickiest surfaces in a countertop square footage calculation. This is because islands come in different sizes, and they can also have additional details such as waterfall or part for bar stools. Let’s take a closer look at these features to make it much easier to figure out the countertop square footage.
Bar Overhang
There are two types of bar overhang. In the first case, it is simply a horizontally extended part of the kitchen island under which there is free space. The average size of this overhang is one foot. It is a comfortable enough size to sit comfortably on chairs at this bar. How to figure out countertop square footage on such an island? Quite simply, since this is a single surface, you only need to measure the length and width of the countertop and multiply them.
The second possible option occurs when the main part of the kitchen island is low enough for bar stools. In this case, the bar overhang is mounted on an additional vertical surface, on the outside of the island. This add-on divides the kitchen island into two levels. The average kitchen countertop square footage will depend on the dimensions of each of the surfaces of a given island.
Kitchen Island Waterfall
The kitchen island waterfall can be a great addition to luxury kitchen design. It is made of the same material as the top countertop of the kitchen island. To correctly calculate the kitchen island square footage with waterfalls, you need to know the area of all surfaces. When designing a kitchen renovation, immediately discuss the presence of waterfalls on your kitchen island with the contractor. This detail will help them to correctly plan the dimensions of kitchen surfaces and calculate the required amount of materials.
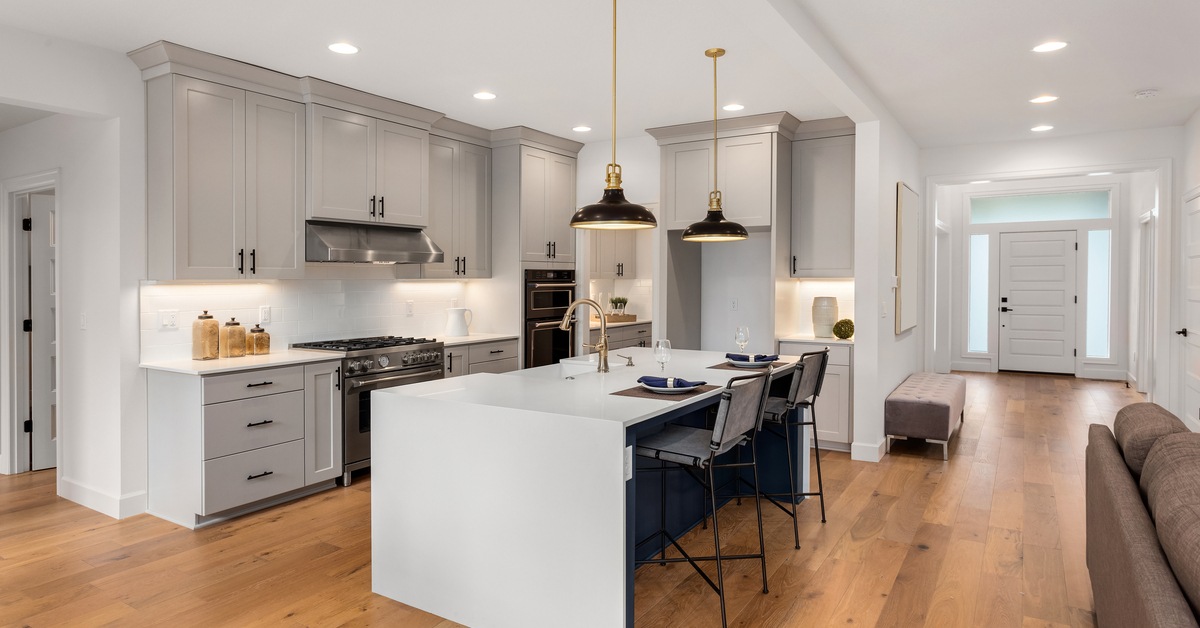
Average kitchen countertop square footage in the large kitchen with island.
Cabinets (34 + 34 + 50 + 20) * 24 = 3312 (23 sq. ft.)
Waterfalls 48 * 36 * 2 = 3456 (24 sq. ft.)
Island countertop 96 * 48 = 4608 (32 sq. ft.)
Total = 23 + 24 + 32 = 79 sq. ft.
It is worth immediately dividing the measured zones into several parts. Separately measure the kitchen island with waterfalls and all four areas with cabinets. Cabinets in this example are made in such a style that there are overhangs on both sides, which should also be taken into account. Also, do not forget to measure the width of the kitchen island as it can be non-standard, unlike cabinets.
Summing up the collected measurements, the total amount of material needed for the cabinets countertops is 23 square feet. As for the kitchen island, it will need 56 square feet of materials. The total countertop surface area in this kitchen will be 79 squares feet.
Average Kitchen Countertop Square Footage with Backsplash
The use of wall tiles in the backsplash area is becoming less popular. She was replaced by the idea of creating a backsplash from the same material as the countertop. It looks much prettier and much more practical to clean and use. It is much easier to remove splashes and stains from a flat stone surface than to wash them out of each seam between tiles. Based on this, in the average kitchen countertop square footage, it is also worth including the backsplash dimensions.
The standard backsplash height is 16 inches, but this is only in areas where upper cabinets are present. If your sink and stove are also along the wall, then the backsplash behind them will be much larger and can reach 35 inches. Therefore, to calculate the backsplash area, it is necessary to make accurate measurements of these zones and it is better to do this at the stage of repair design.
Size of Slabs for Kitchen Countertops
Kitchen countertops are usually made of various stone materials. These include granite, quartz, marble, and many others, and are sold as prefabricated slabs in a fixed size. Based on this, another factor that affects the average kitchen countertop square footage is the size of the pieces of material from which it is made.
The standard slab size is 4×10 fit and many kitchens try to adjust to this. Depending on the size of the kitchen, two, three, or more slabs may be needed, but the point is that the size of the countertops uses the maximum amount of purchased material and does not have to throw away most of the slabs in the trash.
For example, if your countertop is 2 x 25 feet, then one slab will not be enough for this, but buying a whole slab for such a small piece will also not be advisable, since such slabs are expensive. That is why Remodel on point recommends that you calculate square feet of countertop correctly and entrust this work to professionals.
latest video
news via inbox
Nulla turp dis cursus. Integer liberos euismod pretium faucibua