Do you need permits for basement underpinning

Do You Need Permits for Basement Underpinning?

Last Updated: 2021-12-04By

Yes, basement underpinning job requires permit and architectural drawings. It shows necessary structural work that has been approved by licensed engineer. Underpinning Permit is created for calculating loads for new footings and foundation walls that need to be poured.

All structural work in Ontario is required to have drawings with appropriate permit. Some companies try to go around the rules and save few thousand dollars only to later find out that their job has been shut down by ministry of labor and fines are issued for working without permit.

Home owners should shut their door immediately in front of contractors that propose structural work without the permit to save money or time. On the day of estimate our project manager will explain what permits and reports are needed from the city to start the job of lowering basement.

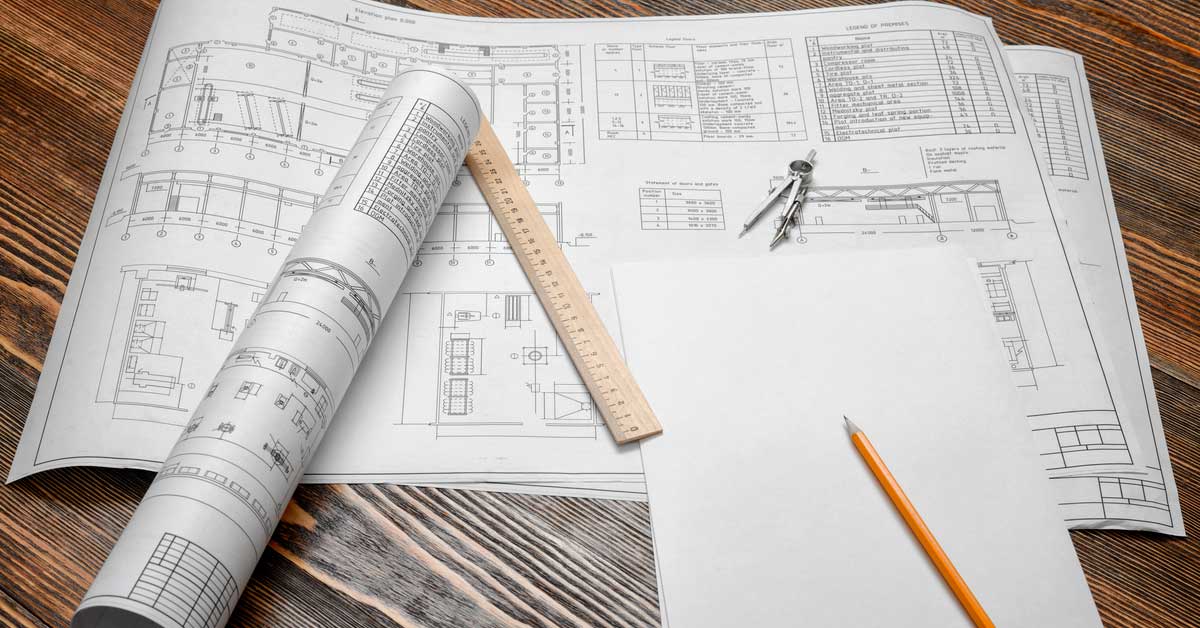
Architectural Drawings for Project

In order to submit required changes of your house to the city for approval everything needs to be reflected on professional drawings. City officials have to be able to understand requested changes with structural details. This step is absolutely necessary for contactor to understand what has been asked by the architect to do and approved by the city.

These architectural drawings will have necessary details of how the work should proceed with structural supports and changes to the building. Our team works with architects that can assist in creating proper drawings for the underpinning project at your home.

Engineers and Stages for Home Underpinning

Each underpinning is performed in sections. To continue support entire weight of the house on existing footings and at the same time extend them, underpinning is usually done in three or four stages. Entire exterior wall is divided into approximately two to three foot sections and all of them are marked as per engineer.

In the beginning all number one sections throughout the house are dug out and footings are extender to appropriate height. After each stage city inspector or engineer has the responsibility to approve the work to proceed forward. The same process continues until all sections for footings are completed.

Costs for Permits and Drawings

Expenses start with architectural drawings. Depending on size of the basement, structural changes and necessary beams the cost can range from $2000 to $6000. Structural engineer charges between $500 to $1000 for reviewing the drawings, approving them with stamp and submitting for permit.

The actual permit fee from city for basement underpinning is on average $800. Basic 800 square foot basement with average depth increase without complicated structural changes will cost around $4000 for all drawings and permits.

Additional charges may be for requested visits of structural engineer, requests from home owner to change the layout and resubmitting the drawings.

Timing for Basement Underpinning Permits

Timing for basement underpinning permits

Expectation of schedules for basement lowering.

If your basement is completely open and architect can see the structure of the joists with supports, all drawings can be completed within two weeks for average size basement. Engineering part with stamps and approval can be done quite fast and only within one week you can be ready to submit for the permit.

After submitting everything it all depends on season and how busy permitting department is. In best case scenario during the winter your basement underpinning permit can be approved within two weeks.

In more busy times it can take up to 5 weeks for the answer from city officials. Delays may occur in uncovered basement, with additional architectural remarks after demolition. Overall the process of obtaining permit takes six to eight weeks.

What Happens if Work Done without Permit

Company that is doing the work at home for underpinning will not provide proper warranty without permit. There will be simply no ground for home owner to approach them if something goes wrong. Permitting is responsibility of the property owner and he or she needs to follow local bylaws.

Let’s say you proceeded with the work knowing there must be permit obtained for home underpinning but never got it. Neighbors can complain about ongoing work and city inspector or official may stop by to check things out.

When they find out there is ongoing project without open permit, project gets immediately shut down until proper documents submitted. Home owners may be charged with hefty fee as well.

The last point on problems associated with not getting permit is the actual quality of work. How can professionals perform such a technical project without approved engineering details? There will be mistakes and shortcuts made if third party does not get involved for inspections and quality checks.

Exception when Permit for Underpinning not Required

The only situation where we think permit is not required for home underpinning is in areas where local bylaws do not include such previsions. You will almost never see it happening, but very rarely there are properties literally in the middle of nowhere. They build what they want and however they feel is suitable for them.

Underpinning projects are very technical and can cause entire structure to fall down if not performed with caution. Even in areas where there is not inspector to oversee the job, we still suggest contacting engineer or architect for confirmation of work process.

Conclusion for Underpinning Permit Requirements

Conclusion for basement underpinning permits

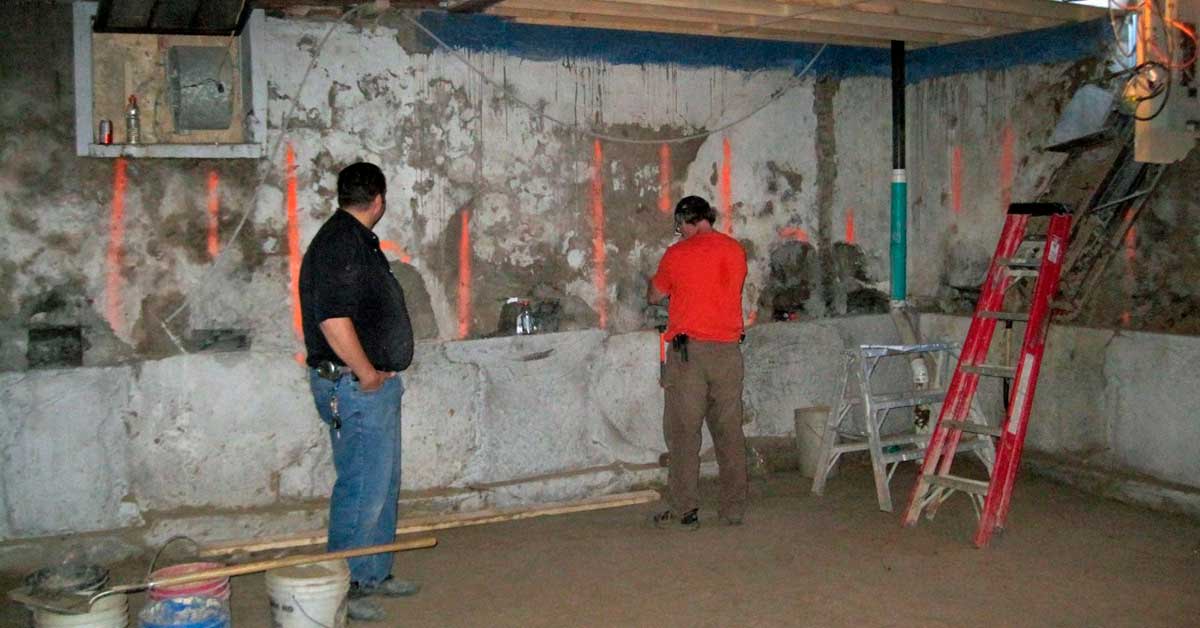
Stages of concrete underpinning marked on walls.

We cannot stress enough on safety of construction projects. Underpinning of a house means literally lowering down its foundation walls with footings to create space below ground. In order to do that, entire wright of the house has to be temporary put on something while walls extend down.

There is no good reason to ignore precautions and local bylaws. Charges from building inspector are only the beginning of worst things that could happen.

Home owners can spend extra tenth of thousands of dollars to redo half of project when caught doing illegally and obligation to change most of work. Who can you blame when your house collapses due to avoidance to architectural and engineering specs?

On Point Remodeling strongly advices all home owners who plan to proceed with underpinning project to carefully approach work process and complete all necessary permits. Contact local authorities and they would be happy to guide you in the right direction.

editor's pick

latest video

news via inbox

Nulla turp dis cursus. Integer liberos  euismod pretium faucibua

Each building has some sort of driveway or at least should have. The main reason is for vehicles to come closer without need to walk all the way. Some homes are residential with small driveway for their car to come in and park before garage or front entrance, and others can be large commercial buildings with loading docks, delivery entrances and casual parking entrances. On Point Remodeling was asked for suggestions on residential driveway for new home construction, and we decided to write detailed article for all our readers. Using this guide you can select the material for your driveway and see what works for your budget. Here are the materials for driveway we will be discussing in our guide:
  • Asphalt
  • Concrete
  • Paver Stone
  • Crushed stone
  • Brick
  • Seashell
  • Gravel
To find good contractor for your driveway, you can either ask our team by email or try to find someone local that worked with neighbors or nearby buildings.

Installation process of any material surface on your driveway

a) Demolition and Excavation – Before anything is done, your contractor will get heavy machinery and scratch off old layer of driveway. They need to go down at least 5-6 inches to insure proper layering before your final layer of material is installed. b) Material Purchase and Delivery – At this point your contract is signed and you already know how the surface will look. Contracting company purchases necessary materials and delivers them to site. Double check if material is correct and not damaged. c) Preparation of Sublevel – Whatever you place as final material, it cannot just be installed directly on top soil. Gravel is the first choice of material that goes down at this stage. Other preferred material is screen sand that can go on top of gravel and works better with stone and bricks. d) Compaction of Ground – To prevent your driveway from moving and changing shapes, all the layers from bottom up have to be properly compacted. Do not leave any spot untouched while doing this or you can get small holes and cracks in driveway after installation. E) Final Installation – This is when all the magic happens. After all preparations and dirty work the final installation is made literally within hours and you can enjoy new driveway. Stone and brick is set up by hand, while other materials require some sort of machinery with manual labor to even out surface.

1. Asphalt

Probably the most used material for road top surfaces as well as driveways is asphalt. This is a mix of gravel and sand that is mixed in and combined by asphalt cement with crude oil. Pros of Asphalt Driveway
  • Very popular and easy to find materials/contractor
  • Completed in 1 day and you can drive on it after
  • Patches and small holes can be fixed fast
Cons of Asphalt Driveway
  • Easy to damage and cracks appear in few years
  • Almost everyone else has same surface
  • Oily surface and chemicals used in mix
Prepared for asphalt driveway will cost you around $5 per square foot to finish. The contractors that take care of entire process from taking out old driveway surface, install subsurface and compact the ground with new asphalt on top, will charge on average $5500 per regular size driveway at single home property.

2. Concrete

What we call concrete is a mixture of Portland cement, aggregate as well as sand with gravel. Suggested thickness of concrete for driveway is 6 inches. The mixture needs to cure without being touched or driven on top for several days. Pros of Concrete Driveway
  • Durable material for large weights
  • Long lifespan if installed properly
  • Winter and summer friendly
Cons of Concrete Driveway
  • Has marks and stains over time
  • Hard to repair without replacement
  • Super hard to DIY
To hire contractors for concrete driveway it will cost around $7-$9 per square foot. This will include site preparation with gravel spread and new concrete installation. They will order full truck of concrete (or several for larger driveways) to pour inside forming. Smoothening and curing is required after installation.

3. Paver Stone

The most luxurious material that you can use to create driveway path with is paver stone. It is made out of natural stone with uneven rough shapes that have different line patterns. Paver stones are very heavy and are perfect for weights on top of them. Almost every city in Europe has roads and walks made out of stone that were installed centuries ago. Pros of Paver Stone Driveway
  • Creative designs can be done
  • Personal looks, can match the house
  • Can replace single stone in minutes
Cons of Paver Stone Driveway
  • Weeds growing through
  • Stone can move over time
  • Most expensive material
There is wide selection of stone that can be purchased for your driveway. On average we recommend settling with $17-$20 per square foot for stone with installation included. Working with this material is very intense labor and we recommend hiring professionals that do this type of work every day.

4. Crushed Stone

Our readers sometimes mistake crushed stone with gravel, but this is not the same material. Crushed stone material is achieved when machine is mechanically crushing larger pieces of unused stone for this specific purpose. It is larger than gravel and can have smooth finish. Crushed stone can also have a mix of colors, which is much pleasant to eyes than gravel. Pros of Crushed Stone Driveway
  • Low maintenance required
  • Fits rural area style
  • Can be reused for other purposes
Cons of Crushed Stone Driveway
  • Gets very hot during summer
  • Can be messy after many drives
  • Hard to remove snow and ice
Buying crushed stone and installing it on your driveway is as easy as it gets. Similar to other rough materials discussed in this post, only small tools like shovels, dolly and buckets are required to spread it on the road. The cost of crushed stone driveway is between $4 and $6 per square foot from professional local contractors that can finish the job in several days.

5. Brick

The same brick we see being used in wall construction can be installed as top driveway surface. Brick is manufactured by compressing clay with plastic mass. It is heated to extreme temperature and dried up to become as solid as you know it. Pros of Brick Driveway
  • Variety of selections in shapes and shades
  • Bricks are recyclable
  • Slip resistant with rough top part
Cons of Brick Driveway
  • Needs regular maintenance
  • Change color over time
  • Old fashion looking
Installing brick on driveway costs $10 per square foot, which is not too far from masonry brick laying as part of the wall. To save money you can use or purchase old brick, that was part of a wall before. Do not mix these two jobs and contact landscaping professionals instead of masonry contractors that work with bricks.

6. Seashell

This material is popular on the coast line where shells can be found near the water. Construction companies use seashells to add in other materials as well as spread them on driveway in rough condition, without adding anything else. It usually comes in white or pearl color and darkens within year because of mixing with sand and dirt. Pros of Seashell Driveway
  • Environmentally friendly
  • Has natural drainage
  • Creates worm vibe of beach house
Cons of Seashell Driveway
  • Break and crack under light weight
  • Sharp and very hard to walk on
  • Gets stuck in shoes and tires
To deliver and spread seashells on driveways costs below $4, which is only slightly more expensive than rough gravel. As you go further from coast line, cost of material increases due to delivery. This material is elegant and very soft. We recommend adding edge lines with darker color landscape material to create visual path.

7. Gravel

This material is used in other construction mixes and underlayment systems. It’s literally fragments and small crushed stones that are put on top of soil. It is easily spread out by hands and anyone can do it. Pros of Gravel Driveway
  • Cheapest of them all
  • Easy DIY Job
  • Can install another material on top
Cons of Gravel Driveway
  • Needs to be graded very often
  • Will mix with dirt and leaves
  • Washes up with heavy rains
It is rough material and can be purchased in bulk (by metric tons or cubic meters). The cost of driveway with gravel should not exceed $3 per square foot, but you can save tons of money by purchasing materials and doings installation by yourself. You do not require specific tools or heavy equipment for the job and delivery of gravel can be arranged directly to your project.

Conclusion

To properly finish any and all of these driveways requires skills and experience. There is no way you can complete any of these projects without heavy equipment and tools that regular home owner’s just store in their garages. Most of those who will read this post will prefer to install asphalt driveway, because of its popularity and low costs. We want to encourage home owners to go for personal preference and what matches your house, rather than getting the most affordable and popular items. Driveway jobs have to be completed fast; otherwise you will need to park elsewhere while the project is running. To not overpay, ask us for quotation sample on material you prefer in specific region where the work need to be done and our team can provide some numbers.

Leave A Comment