House Demolition Equipment

House Demolition Equipment and Popular Tools Used

Last Updated: 2022-02-16By

Full demolition of the house is completed with excavator and truck that drives away debris. Bulldozers may be used to help push and move materials from one side to another in larger home demolition jobs.

In simple words its literally one machine that takes down the house and dump truck that picks up construction material that are left. This however is not always the case. There are far more complicated home demolition projects that require more machinery and specific equipment.

Today we are talking about tree common types of projects and house demolition equipment used in each process.

  1. Small Residential House Demolition Equipment
  2. Manual House Demolition Tools
  3. Commercial Building Demolition Equipment

Each type of work requires different machinery and tools. Our team is not going deep into rare situations like explosions, underwater demolishing or other complicated jobs.

[instagram-feed]

Small Residential House Demolition Equipment

Taking down a house is not a complicated process for professional excavator operator. Home owners don’t realize that entire process of demolishing a house is calculated by hours and literally within half a day, entire home is broken apart and loaded into trucks for disposal.

A small team of two or three people can manage to get it done relatively fast. Every operator needs a helper or signaller to direct him. Third person would be in control of bobcat to push, load or dismantle smaller structures.

Here is a list of house demolition equipment used for small residential jobs:

  • Excavator
  • Bobcat
  • Disposal Bin

Demolition companies own most of equipment used for jobs. Disposal trucks with bins are hired / contracted as third parties.

Home owners or contractors that want to separate work into pieces for DIY project are recommended to rent heavy equipment with licensed operator. It will save time and significantly reduce chance of things going south.

Expenses associated with residential house demolition equipment

ExcavatorBobcatDisposal Bins
To Rent$500 – $1000 / day$300 – $600 / day $250 – $550 / load
To Buy and Own$30 000 – $60 000$20 000 – $30 000 $30 000 – $40 000
Maintenance$10 000 / year$4 000 / year $6 000 / year
Costs vary on location and time of year

When renting equipment, maintenance costs are not added to the picture. Keep in mind companies that own necessary machinery for demolitions require large yards or warehouses for storage.

Manual House Demolition Tools

Dismantling interior of the house or sometimes entire structure by hand with tools is completely different story. It is done when machines cannot be brought to jobsite due to complicated landscape, tight spaces or other complicated situations.

Another reason for manual house demolition with hand tools is that major structure has to stay without further damage. Excavators and bulldozers would definitely cause disruptions and weaken integrity of loadbearing walls.

Take a look at our list of tools suggested for demolition by hand:

  • Hammer / Sledgehammer
  • Pry Bar and Crow Bar
  • Sozzle saw
  • Shovel
  • Jack Hammer
  • Buckets/Buns/Bags

Small demo jobs would be just fine to complete with this short list of tools. Additional saws, drills, knives and handy items can assists during the work, but main 6 are always there.

Hammer / Sledgehammer – the one and only tools used everywhere by everyone. Such a simple tools that hits, pulls out nails and wrecks. You can buy it for $15 – $40 and have for very long time. Very hard to damage and break.

Pry Bar and Crow Bar – used to lever heavier or attached items together. For example removing door/window frame or nailed down floor with crow bar is a piece of cake. Market price is between $10 and $25 and like hamper it is very hard to break.

Sozzle Saw – great tool to cut interior walls, doors and other wood materials. It is portable and easy to carry. Just switch a blade and carry on with cutting studs or plywood. Can be bought for just $100 – $150.

Shovel – simply scoop up debris with shovel and place into binds or bags. The easiest way to place waste material by most cost efficient tool. Get it for around $50 – $70.

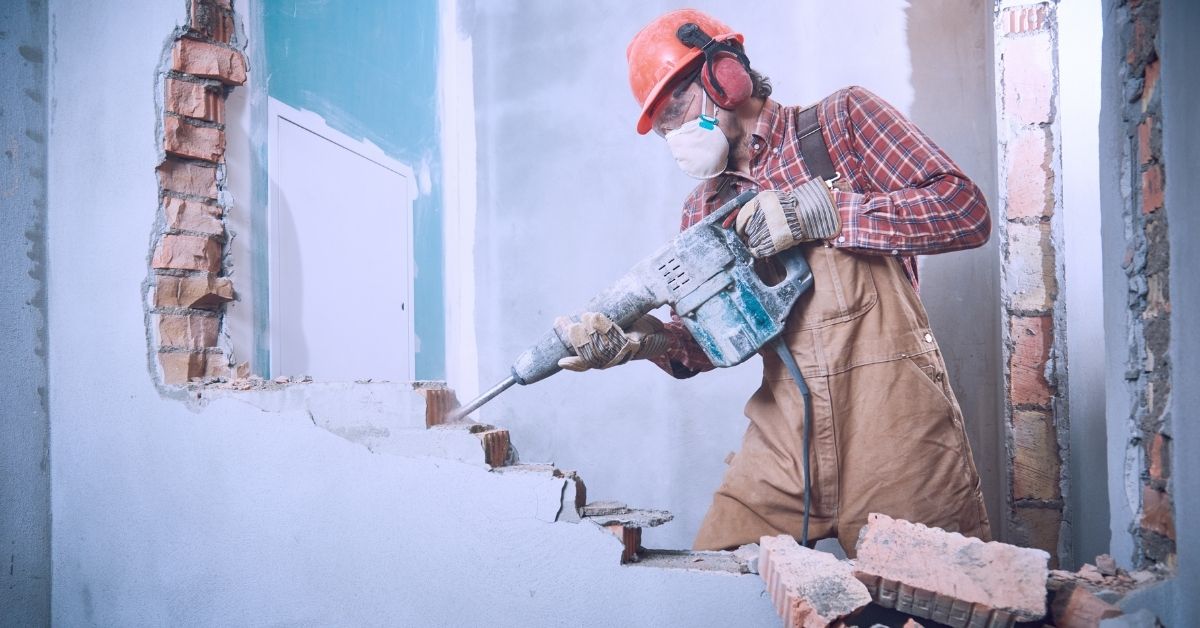
Jack Hammer – amazing for breaking concrete, bricks or stone. It hammers rapidly with force to break solid structures, but should not be used on steel. Attachments can be used for similar purposes like removing tiles. Cost of good jackhammer is $1000 – $1500

Buckets/Bins/Bags – carry debris to trucks or construction bins in buckets or heavy duty bags. Bags are used in sensitive areas where area next to construction has to be protected from dust. $50 can get you a long way for bags and bins.

All above listed tools can be purchased online or at any local hardware store. To save money, home owners may want to take on demolition part of work. Tools are not expensive and work does not require technical knowledge.

In that case we recommend taking all safety precautions and using personal protective equipment during work. These house demolition tools can be bought for under $2000. Renting them does not make financial sense even if you have one job.

Commercial Demolition Equipment

Stepping up a notch and we can get ourselves looking over commercial demolition projects. For some it would be ordinary day and for others something extraordinary and completely out of scope.

Commercial projects involve large equipment to perform big jobs faster and safer. We are talking about taking down hotel buildings, bridges, warehouses and other large structures.

Besides insane amount of safety with constant supervision on jobsite, demolition equipment has to be selected for the right use. Larger buildings require long reach machines with ability to grab and load heavier pieces.

Popular Commercial Demolition Equipment:

  • Long Reach Excavator
  • Material Loader and Handler
  • Bulldozer
  • Hydraulic Hammer
  • Wrecking Ball
  • Bin Trucks

This is obviously just a short list of top 6 machines and equipment tools used in commercial demo, but in reality there are tenths of additional demolition excavators, cranes and tools.

20 % of companies that operate within commercial industry own their equipment, while 80% rent everything. Although renting may seem expensive, it takes away responsibility and liability from companies.

Maintaining, licensing, fixing and storing is very problematic for large demolition equipment. Professional technicians, supervisors and safety personnel has to be hired just to keep everything in-house.

Before selecting commercial demolition equipment for the project, list all tasks and ask for suggestions from professionals. Operators or managers at rental companies can combine machines that will serve perfectly.

Summarizing House Demo Equipment and Tools 

Hundreds of tools and machines are used to demolish a house or building structure, but we can talk only about few popular items.

Local companies should understand their own workflow before purchasing or using any specific tools.

Fortunately demolition industry is broad widely used. Literally demolition is beginning of another construction or renovation.

Tools and equipment are available through internet sources like amazon or brand websites. Local store can have most of above suggested tools, but in reality the selection is not even close to what you can choose from online.

For those who end up buying tools, the storage and maintenance is very important. Place everything in moderate temperature rooms with low moisture level. It will help to prevent steel and inner parts from rusting.

Watch out for ware out on blades. In worst case scenarios, it blade can kick back and cut you pretty badly. Always follow recommendations and instructions from manufacturer.

editor's pick

latest video

news via inbox

Nulla turp dis cursus. Integer liberos  euismod pretium faucibua

Each building has some sort of driveway or at least should have. The main reason is for vehicles to come closer without need to walk all the way. Some homes are residential with small driveway for their car to come in and park before garage or front entrance, and others can be large commercial buildings with loading docks, delivery entrances and casual parking entrances. On Point Remodeling was asked for suggestions on residential driveway for new home construction, and we decided to write detailed article for all our readers. Using this guide you can select the material for your driveway and see what works for your budget. Here are the materials for driveway we will be discussing in our guide:
  • Asphalt
  • Concrete
  • Paver Stone
  • Crushed stone
  • Brick
  • Seashell
  • Gravel
To find good contractor for your driveway, you can either ask our team by email or try to find someone local that worked with neighbors or nearby buildings.

Installation process of any material surface on your driveway

a) Demolition and Excavation – Before anything is done, your contractor will get heavy machinery and scratch off old layer of driveway. They need to go down at least 5-6 inches to insure proper layering before your final layer of material is installed. b) Material Purchase and Delivery – At this point your contract is signed and you already know how the surface will look. Contracting company purchases necessary materials and delivers them to site. Double check if material is correct and not damaged. c) Preparation of Sublevel – Whatever you place as final material, it cannot just be installed directly on top soil. Gravel is the first choice of material that goes down at this stage. Other preferred material is screen sand that can go on top of gravel and works better with stone and bricks. d) Compaction of Ground – To prevent your driveway from moving and changing shapes, all the layers from bottom up have to be properly compacted. Do not leave any spot untouched while doing this or you can get small holes and cracks in driveway after installation. E) Final Installation – This is when all the magic happens. After all preparations and dirty work the final installation is made literally within hours and you can enjoy new driveway. Stone and brick is set up by hand, while other materials require some sort of machinery with manual labor to even out surface.

1. Asphalt

Probably the most used material for road top surfaces as well as driveways is asphalt. This is a mix of gravel and sand that is mixed in and combined by asphalt cement with crude oil. Pros of Asphalt Driveway
  • Very popular and easy to find materials/contractor
  • Completed in 1 day and you can drive on it after
  • Patches and small holes can be fixed fast
Cons of Asphalt Driveway
  • Easy to damage and cracks appear in few years
  • Almost everyone else has same surface
  • Oily surface and chemicals used in mix
Prepared for asphalt driveway will cost you around $5 per square foot to finish. The contractors that take care of entire process from taking out old driveway surface, install subsurface and compact the ground with new asphalt on top, will charge on average $5500 per regular size driveway at single home property.

2. Concrete

What we call concrete is a mixture of Portland cement, aggregate as well as sand with gravel. Suggested thickness of concrete for driveway is 6 inches. The mixture needs to cure without being touched or driven on top for several days. Pros of Concrete Driveway
  • Durable material for large weights
  • Long lifespan if installed properly
  • Winter and summer friendly
Cons of Concrete Driveway
  • Has marks and stains over time
  • Hard to repair without replacement
  • Super hard to DIY
To hire contractors for concrete driveway it will cost around $7-$9 per square foot. This will include site preparation with gravel spread and new concrete installation. They will order full truck of concrete (or several for larger driveways) to pour inside forming. Smoothening and curing is required after installation.

3. Paver Stone

The most luxurious material that you can use to create driveway path with is paver stone. It is made out of natural stone with uneven rough shapes that have different line patterns. Paver stones are very heavy and are perfect for weights on top of them. Almost every city in Europe has roads and walks made out of stone that were installed centuries ago. Pros of Paver Stone Driveway
  • Creative designs can be done
  • Personal looks, can match the house
  • Can replace single stone in minutes
Cons of Paver Stone Driveway
  • Weeds growing through
  • Stone can move over time
  • Most expensive material
There is wide selection of stone that can be purchased for your driveway. On average we recommend settling with $17-$20 per square foot for stone with installation included. Working with this material is very intense labor and we recommend hiring professionals that do this type of work every day.

4. Crushed Stone

Our readers sometimes mistake crushed stone with gravel, but this is not the same material. Crushed stone material is achieved when machine is mechanically crushing larger pieces of unused stone for this specific purpose. It is larger than gravel and can have smooth finish. Crushed stone can also have a mix of colors, which is much pleasant to eyes than gravel. Pros of Crushed Stone Driveway
  • Low maintenance required
  • Fits rural area style
  • Can be reused for other purposes
Cons of Crushed Stone Driveway
  • Gets very hot during summer
  • Can be messy after many drives
  • Hard to remove snow and ice
Buying crushed stone and installing it on your driveway is as easy as it gets. Similar to other rough materials discussed in this post, only small tools like shovels, dolly and buckets are required to spread it on the road. The cost of crushed stone driveway is between $4 and $6 per square foot from professional local contractors that can finish the job in several days.

5. Brick

The same brick we see being used in wall construction can be installed as top driveway surface. Brick is manufactured by compressing clay with plastic mass. It is heated to extreme temperature and dried up to become as solid as you know it. Pros of Brick Driveway
  • Variety of selections in shapes and shades
  • Bricks are recyclable
  • Slip resistant with rough top part
Cons of Brick Driveway
  • Needs regular maintenance
  • Change color over time
  • Old fashion looking
Installing brick on driveway costs $10 per square foot, which is not too far from masonry brick laying as part of the wall. To save money you can use or purchase old brick, that was part of a wall before. Do not mix these two jobs and contact landscaping professionals instead of masonry contractors that work with bricks.

6. Seashell

This material is popular on the coast line where shells can be found near the water. Construction companies use seashells to add in other materials as well as spread them on driveway in rough condition, without adding anything else. It usually comes in white or pearl color and darkens within year because of mixing with sand and dirt. Pros of Seashell Driveway
  • Environmentally friendly
  • Has natural drainage
  • Creates worm vibe of beach house
Cons of Seashell Driveway
  • Break and crack under light weight
  • Sharp and very hard to walk on
  • Gets stuck in shoes and tires
To deliver and spread seashells on driveways costs below $4, which is only slightly more expensive than rough gravel. As you go further from coast line, cost of material increases due to delivery. This material is elegant and very soft. We recommend adding edge lines with darker color landscape material to create visual path.

7. Gravel

This material is used in other construction mixes and underlayment systems. It’s literally fragments and small crushed stones that are put on top of soil. It is easily spread out by hands and anyone can do it. Pros of Gravel Driveway
  • Cheapest of them all
  • Easy DIY Job
  • Can install another material on top
Cons of Gravel Driveway
  • Needs to be graded very often
  • Will mix with dirt and leaves
  • Washes up with heavy rains
It is rough material and can be purchased in bulk (by metric tons or cubic meters). The cost of driveway with gravel should not exceed $3 per square foot, but you can save tons of money by purchasing materials and doings installation by yourself. You do not require specific tools or heavy equipment for the job and delivery of gravel can be arranged directly to your project.

Conclusion

To properly finish any and all of these driveways requires skills and experience. There is no way you can complete any of these projects without heavy equipment and tools that regular home owner’s just store in their garages. Most of those who will read this post will prefer to install asphalt driveway, because of its popularity and low costs. We want to encourage home owners to go for personal preference and what matches your house, rather than getting the most affordable and popular items. Driveway jobs have to be completed fast; otherwise you will need to park elsewhere while the project is running. To not overpay, ask us for quotation sample on material you prefer in specific region where the work need to be done and our team can provide some numbers.

Leave A Comment