Pier and Beam Foundation

Building a Pier and Beam Foundation House

Last Updated: 2022-02-16By

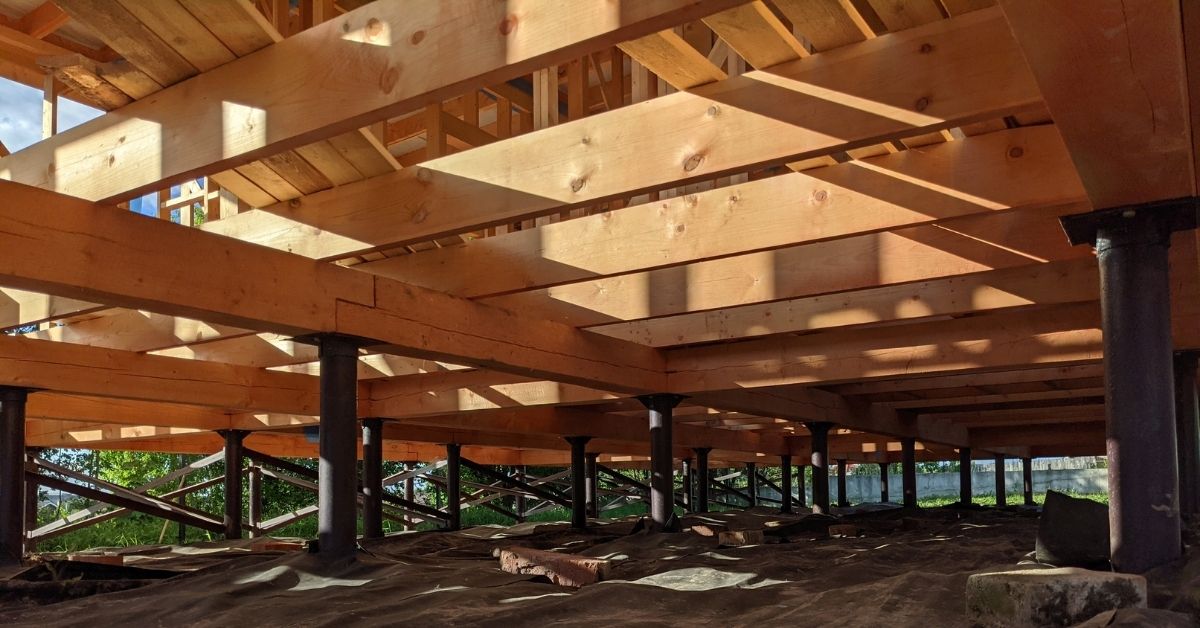
House construction on floating slab system that sits on concrete piles or posts is called pier and beam foundation. It is alternative to crawlspace foundation, but does not have enclosure and perimeter foundation wall with footings. Multiple concrete piers (like legs) hold main subfloor and weight of entire house.

For as long as we know houses were built on raised structures to avoid water floods and keep safe from animals. Eventually pier and beam foundation became a construction method on uneven or unstable grounds.

For example if house is being constructed on high slope land or on rocky surface. The cheapest and easiest foundation to hold home is drilling holes and pouring concrete for creating piers. It gives options for building on many surfaces that slab on grade or basement foundation would never work.

How Much does Pier and Beam Foundation Costs?

The average cost for pier and beam foundation is $10.5 per square foot of main floor space. In complicated areas where excavation for piers is deeper or much harder than regular soil the costs can get as high as $16-18 per square foot.

[instagram-feed]

Our calculation tells us that regular size concrete piers are poured 6-8 feet apart from each other to support beams and main subfloor level. In this example 1000 square foot house would require 30-32 concrete piers and 7-8 beams on top.

Expect to pay $300 for each pier to be excavated and poured with concrete. Rebar or is recommended for additional strength, but it does not cost a lot and should be included in the price. Regular beams cost $200 with installation and additional hangers.

Contractors use sonotubes for easy installation of pier and beam foundation as well as any other concrete posts. It is a cardboard that servers a as form for concrete pouring. They are sold by regular dimensions used in construction.

Construction Method for Piers and Beams

The process of building a pier and beam foundation is relatively easy when soil is not without large rocks or too much water. It works great on Type 1,2,3 Soil, and slightly more complicated on type 4.

For home owners or contractors that are interested in step by step process we listed these 5 easy procedures:

Step 1 – Planning Piers

Hopefully you are working with licensed engineer that plans out entire load of house with exact amount and sizes of concrete piers. Planning on site consists of marking spots where new piers will be built. We suggest using strings to make sure markings are set on straight line.

Step 2 – Excavating Holes

Next we start excavating for required depth and size of piers that are confirmed with engineer. The old method of using shovel is long gone and nowadays special machines used for specific size and depth excavation. Bobcat attachments are also available for such work.

Step 3 – Pouring Concrete

Fours for each pier stick out of the ground to avoid direct contact between beam and soil. The most popular forming method is sonotubes as we mentioned before. Cardboard round shaped tubes are installed in dug out holes and concrete is poured inside. For extra strength metal rebar is used.

Step 4 – Attaching Beams

Hopefully concrete piers that were poured all line up and have the same height. Its better to get them slightly higher and chip off than redoing a pier completely because it sits lower than the rest. Beams are attached to piers and form a strong floating foundation for the house. Bolts and heavy duty hangers are used to attach beams together. Welding may also be required.

Step 5 – Installation of Floor System

The last thing is to attach floor joist to beams and start construction of the house. The sizes of all joists with connection should be specified by qualified engineer. Often enough we see entire prebuilt houses set up on pier and beam foundation systems.

Pier and Beam Foundation Pros and Cons

Every method of construction has advantages and disadvantages. To understand what works for your home build we decided to provide entire list of pros and cons for building a pier and beam foundation with key factors.

Pros

Less Chance of Flooding – Elevated main floor supported on long concrete piers has almost no chance of water coming in. Distance from ground is usually 2-3 feet to subfloor joists.

Ability to Build on All Sorts of Terrains – Other foundation methods can be used on flat grounds with stable soil. Few single piers allow homes to be built on almost any type of spoil and elevation.

Cheap Construction on Average Soil – Building piers and beams foundation on soil without complication is one of the easiest. It is also not complicated, comparing to basement or even crawl space.

Flexible Maintenance of Mechanicals from Underneath – There is a lot of space to maintain or fix plumbing pipes and electrical from underneath. Spaced out piers allow crawling under the house for repairs.

Cons

Need Maintenance of Piers Every Few Years – All structural supports are exposed to nature and need regular fixes. Water and wind deteriorates everything within time and exposed posts have to be looked at constantly.

Broken Pier can Damage House – Heavy load is spread between each post and if one gets broken the load goes onto nearest pier. This can potentially damage or tilt the house.

Animals and Insects Get Inside from Below – Because the house does not go all the way to the ground it is exposed from underneath. Without proper insulation in all spots with tight protection tiny animals or ants can start a nest.

Lose Heat from Every Side – Every house needs tight enclosure for keeping temperature inside. Unfortunately pier and beam foundation creates extra side (below) that affects it. Even with proper insulation the floor may feel cold in north regions.

Construction Materials and Tools Used

Some of you may think of doing this work on your own and wondering what type of materials does pier and beam foundation construction require. The second question we try to answer is what are the tools needed for work.

Before anything starts we always encourage contractors to plan out future house position and stability. Therefore working with soil is sort of mandatory. Even if ground is flat with perfect type of soil you don’t want to build it and later have plants starting to grow underneath.

Small excavator or bobcat does the trick. Scrape up to 10 inches of soil if possible and level it as much as possible or necessary.

Same machinery can be used to drill the holes for piers. Bobcat extension is available for rent in major hardware stores. Of course you can always shovel it by hand.

Forming for concrete pouring is necessary. Otherwise it will just flow everywhere and you will not get adequate structural strength. We suggest sonotubes for that purpose.

Materials that are used in concrete piers is obviously concrete itself and rebar. Regular finishing towel is handy for making smooth tops. Remodel On Point team suggest using concrete vibrator before it sets to make sure it falls all the way to the bottom of the form.

Levels, lasers, measure tapes, strings and other similar tools needed for accurate height and spacing of piers.

Next come the beams that sit on top and connect to each other. Set up requires drills, bolts, hangers and welding in rare cases. These beams may be extremely heavy when lifting by hand is not possible. For that reasons contractors use heavy machinery and boom trucks.

editor's pick

latest video

news via inbox

Nulla turp dis cursus. Integer liberos  euismod pretium faucibua

Each building has some sort of driveway or at least should have. The main reason is for vehicles to come closer without need to walk all the way. Some homes are residential with small driveway for their car to come in and park before garage or front entrance, and others can be large commercial buildings with loading docks, delivery entrances and casual parking entrances. On Point Remodeling was asked for suggestions on residential driveway for new home construction, and we decided to write detailed article for all our readers. Using this guide you can select the material for your driveway and see what works for your budget. Here are the materials for driveway we will be discussing in our guide:
  • Asphalt
  • Concrete
  • Paver Stone
  • Crushed stone
  • Brick
  • Seashell
  • Gravel
To find good contractor for your driveway, you can either ask our team by email or try to find someone local that worked with neighbors or nearby buildings.

Installation process of any material surface on your driveway

a) Demolition and Excavation – Before anything is done, your contractor will get heavy machinery and scratch off old layer of driveway. They need to go down at least 5-6 inches to insure proper layering before your final layer of material is installed. b) Material Purchase and Delivery – At this point your contract is signed and you already know how the surface will look. Contracting company purchases necessary materials and delivers them to site. Double check if material is correct and not damaged. c) Preparation of Sublevel – Whatever you place as final material, it cannot just be installed directly on top soil. Gravel is the first choice of material that goes down at this stage. Other preferred material is screen sand that can go on top of gravel and works better with stone and bricks. d) Compaction of Ground – To prevent your driveway from moving and changing shapes, all the layers from bottom up have to be properly compacted. Do not leave any spot untouched while doing this or you can get small holes and cracks in driveway after installation. E) Final Installation – This is when all the magic happens. After all preparations and dirty work the final installation is made literally within hours and you can enjoy new driveway. Stone and brick is set up by hand, while other materials require some sort of machinery with manual labor to even out surface.

1. Asphalt

Probably the most used material for road top surfaces as well as driveways is asphalt. This is a mix of gravel and sand that is mixed in and combined by asphalt cement with crude oil. Pros of Asphalt Driveway
  • Very popular and easy to find materials/contractor
  • Completed in 1 day and you can drive on it after
  • Patches and small holes can be fixed fast
Cons of Asphalt Driveway
  • Easy to damage and cracks appear in few years
  • Almost everyone else has same surface
  • Oily surface and chemicals used in mix
Prepared for asphalt driveway will cost you around $5 per square foot to finish. The contractors that take care of entire process from taking out old driveway surface, install subsurface and compact the ground with new asphalt on top, will charge on average $5500 per regular size driveway at single home property.

2. Concrete

What we call concrete is a mixture of Portland cement, aggregate as well as sand with gravel. Suggested thickness of concrete for driveway is 6 inches. The mixture needs to cure without being touched or driven on top for several days. Pros of Concrete Driveway
  • Durable material for large weights
  • Long lifespan if installed properly
  • Winter and summer friendly
Cons of Concrete Driveway
  • Has marks and stains over time
  • Hard to repair without replacement
  • Super hard to DIY
To hire contractors for concrete driveway it will cost around $7-$9 per square foot. This will include site preparation with gravel spread and new concrete installation. They will order full truck of concrete (or several for larger driveways) to pour inside forming. Smoothening and curing is required after installation.

3. Paver Stone

The most luxurious material that you can use to create driveway path with is paver stone. It is made out of natural stone with uneven rough shapes that have different line patterns. Paver stones are very heavy and are perfect for weights on top of them. Almost every city in Europe has roads and walks made out of stone that were installed centuries ago. Pros of Paver Stone Driveway
  • Creative designs can be done
  • Personal looks, can match the house
  • Can replace single stone in minutes
Cons of Paver Stone Driveway
  • Weeds growing through
  • Stone can move over time
  • Most expensive material
There is wide selection of stone that can be purchased for your driveway. On average we recommend settling with $17-$20 per square foot for stone with installation included. Working with this material is very intense labor and we recommend hiring professionals that do this type of work every day.

4. Crushed Stone

Our readers sometimes mistake crushed stone with gravel, but this is not the same material. Crushed stone material is achieved when machine is mechanically crushing larger pieces of unused stone for this specific purpose. It is larger than gravel and can have smooth finish. Crushed stone can also have a mix of colors, which is much pleasant to eyes than gravel. Pros of Crushed Stone Driveway
  • Low maintenance required
  • Fits rural area style
  • Can be reused for other purposes
Cons of Crushed Stone Driveway
  • Gets very hot during summer
  • Can be messy after many drives
  • Hard to remove snow and ice
Buying crushed stone and installing it on your driveway is as easy as it gets. Similar to other rough materials discussed in this post, only small tools like shovels, dolly and buckets are required to spread it on the road. The cost of crushed stone driveway is between $4 and $6 per square foot from professional local contractors that can finish the job in several days.

5. Brick

The same brick we see being used in wall construction can be installed as top driveway surface. Brick is manufactured by compressing clay with plastic mass. It is heated to extreme temperature and dried up to become as solid as you know it. Pros of Brick Driveway
  • Variety of selections in shapes and shades
  • Bricks are recyclable
  • Slip resistant with rough top part
Cons of Brick Driveway
  • Needs regular maintenance
  • Change color over time
  • Old fashion looking
Installing brick on driveway costs $10 per square foot, which is not too far from masonry brick laying as part of the wall. To save money you can use or purchase old brick, that was part of a wall before. Do not mix these two jobs and contact landscaping professionals instead of masonry contractors that work with bricks.

6. Seashell

This material is popular on the coast line where shells can be found near the water. Construction companies use seashells to add in other materials as well as spread them on driveway in rough condition, without adding anything else. It usually comes in white or pearl color and darkens within year because of mixing with sand and dirt. Pros of Seashell Driveway
  • Environmentally friendly
  • Has natural drainage
  • Creates worm vibe of beach house
Cons of Seashell Driveway
  • Break and crack under light weight
  • Sharp and very hard to walk on
  • Gets stuck in shoes and tires
To deliver and spread seashells on driveways costs below $4, which is only slightly more expensive than rough gravel. As you go further from coast line, cost of material increases due to delivery. This material is elegant and very soft. We recommend adding edge lines with darker color landscape material to create visual path.

7. Gravel

This material is used in other construction mixes and underlayment systems. It’s literally fragments and small crushed stones that are put on top of soil. It is easily spread out by hands and anyone can do it. Pros of Gravel Driveway
  • Cheapest of them all
  • Easy DIY Job
  • Can install another material on top
Cons of Gravel Driveway
  • Needs to be graded very often
  • Will mix with dirt and leaves
  • Washes up with heavy rains
It is rough material and can be purchased in bulk (by metric tons or cubic meters). The cost of driveway with gravel should not exceed $3 per square foot, but you can save tons of money by purchasing materials and doings installation by yourself. You do not require specific tools or heavy equipment for the job and delivery of gravel can be arranged directly to your project.

Conclusion

To properly finish any and all of these driveways requires skills and experience. There is no way you can complete any of these projects without heavy equipment and tools that regular home owner’s just store in their garages. Most of those who will read this post will prefer to install asphalt driveway, because of its popularity and low costs. We want to encourage home owners to go for personal preference and what matches your house, rather than getting the most affordable and popular items. Driveway jobs have to be completed fast; otherwise you will need to park elsewhere while the project is running. To not overpay, ask us for quotation sample on material you prefer in specific region where the work need to be done and our team can provide some numbers.

Leave A Comment